TL;DR
Background:Guymager is an Open Source disk imaging tool for Linux created by Dutch developer Guy Voncken, licensed under the GPLv2 license. Guymager is not a Windows program. It runs only on Linux.It's one of the tools included on popular Linux distributions, which are focused on Data Security, Penetration Testing and Forensics such as Kali, Deft, Caine, Forens*nix and others.It's also included in the repositories of Ubuntu, Linux Mint and most Debian-based distributions. RPM packages are available through the project home page at: http://guymager.sourceforge.net.It provides a choice of formats for forensic images and includes case management functionality that's very helpful for the forensic investigator. Write BlockerBefore beginning, it's preferable to physically connect the target disk on your forensic computer system using a hardware write blocker in order to prevent the possibility of writing to the device and violating the integrity of the evidence.Open GuymagerThe Guymager opening screen lists the file system devices mounted on the system. Click the device you wish to image. Here, the screenshot shows a 2GB USB Flash drive selected for imaging: Image AcquisitionFor the purposes of this tutorial, we're imaging a 16GB USB 2.0 drive (the middle selection in the opening screen).Right-click on the device you need to image. Choose “Acquire Image.” This will bring up the Acquire Image screen, shown here:
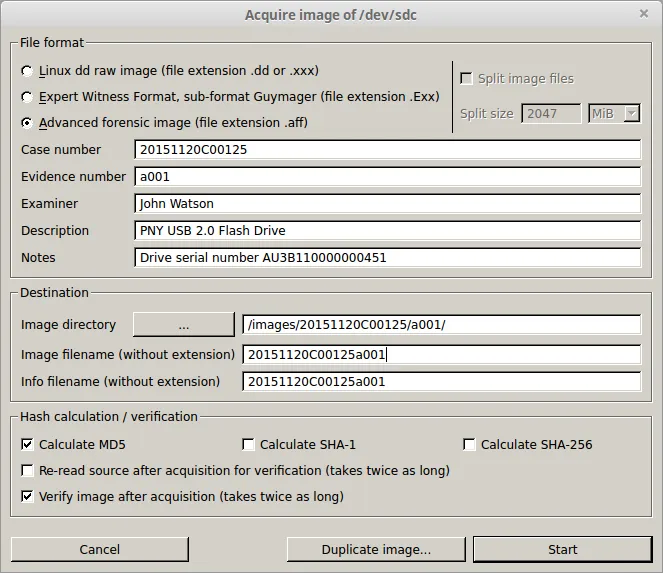
By default, you can choose Linux DD raw image file or Expert Witness Format. A third image format, Advanced Forensic Format (.aff), which can be mounted by third party tools, has been deprecated in the newer iteration of the Guymager interface, but it can be enabled by adding the following line:AffEnabled=trueinto the Guymager configuration file located here on most Linux distributions:/etc/guymager/local.cfgA Guymager DD image will be a forensic quality physical image of the drive, but will be a raw image. Any data about the image will have to be recorded manually.It's much more useful for the investigator to use Expert Witness Format or Advanced Forensic Format. With both of these formats, Guymager will create a metadata .info file along with the drive image that contains essential information for case management. In the Drive Acquisition screen shown, the following case management information has been input:
- Image format
- Case Number
- Evidence Number
- Examiner Name
- Description of the Imaged Device
- Examiner notes – Guymager automatically inserts the drive serial number here, if available.
- Location of the image file
All of this information will go into the Metadata file for the drive image. In this case, the AFF format has been chosen for compatibility with Encase with the mount utility we'll use to mount a working copy of the image for post-acquisition investigation. Guymager also creates a Hash (digital fingerprint) of the device imaged and of the image demonstrating that, at the time of imaging, the drive image has been verified as digitally identical with the imaged device. This is an essential element in demonstrating the forensic integrity of the evidence.Label the imaged device using the same Metadata as input into the Guymager interface, and label the anti-static container used to hold the device and the evidence pouch.Consistent labeling along with the metadata file that accompanies the image is necessary for documenting the evidence and maintaining chain of custody. Once the device has been labeled and the containers are prepared to enter the device into custody after imaging, you're ready to proceed with the imaging of the device.Be sure to select at least one of the checkboxes to calculate hashes for the original drive and acquired image. Even though MD5 is not considered secure for the purposes of confidentiality, we're using the hash to verify the integrity component of encryption. We want the hash to only provide a digital fingerprint of the original drive, and of the acquired image. A match in these two hashes shows that we have a forensic-quality image which will be admissible as evidence.Once the destination path and case management metadata are complete, click the Start button to begin acquiring the image. The following screen will display during acquisition:
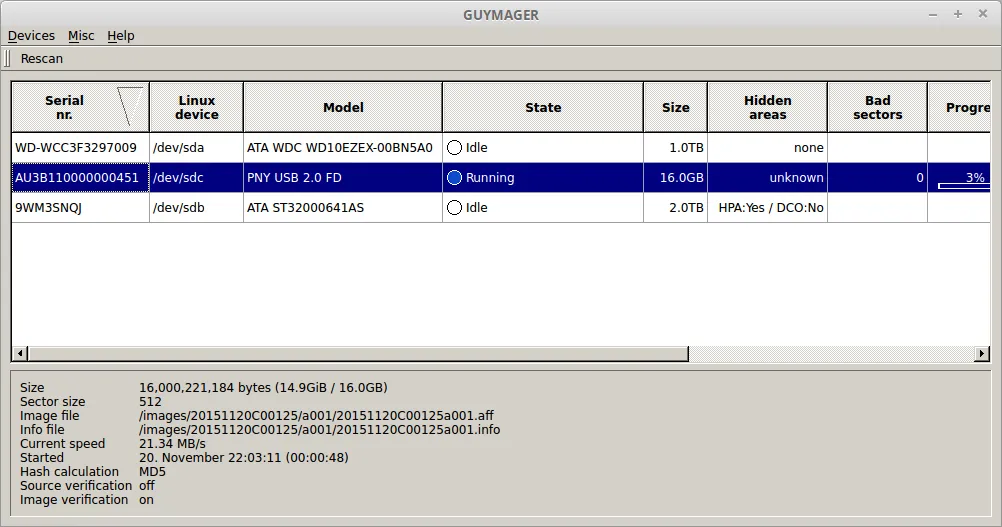
The screen shows the path of the image file and metadata .info file as well as other technical specifics of the acquisition process. The amount of time required for acquisition to complete depends on the size of the drive and the type of connection used to mount it for acquisition. To make acquisition faster, use a forensic acquisition workstation with the capability of mounting using an eSATA port or connection directly to the storage controller via an interposing hardware write blocker.In this example, a USB 2.0 Flash drive is the image target. This is a very slow interface for image acquisition and may be prohibitively so for imaging large external drives. For these, USB 3.0 is preferred,and soon USB-C will be more widely adopted and will allow quicker images for devices that can use it.When imaging is complete the acquisition screen will show Finished.
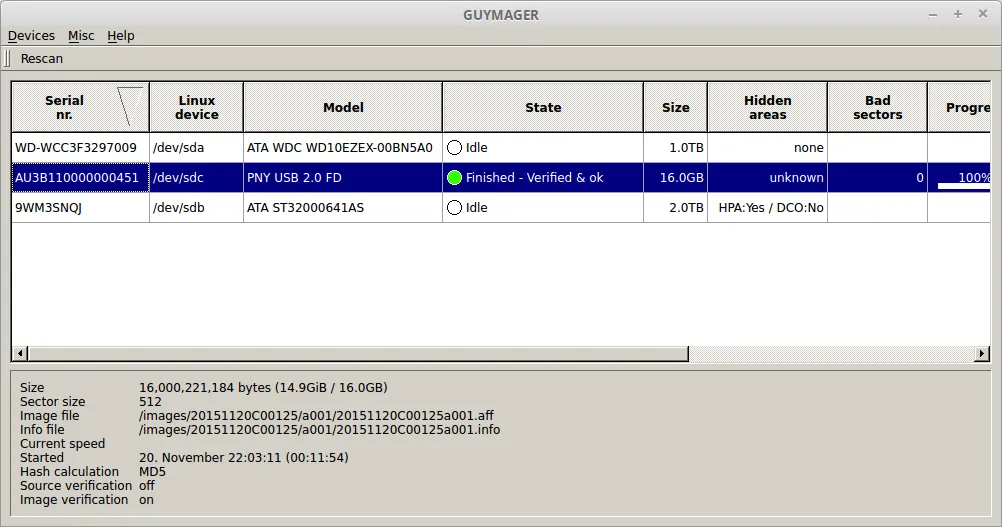
Now, you can simply close the Guymager screen and open the directory where you told Guymager to store the image. Here, you'll see two files: the image file (with the suffix .aff for our file, since we chose Advanced Forensics Format) and the metadata file (with the suffix .info).Open the metadata file. You'll find it's very extensive and includes the following section:`Acquisition===========Linux device : /dev/sdcDevice size : 16000221184 (16.0GB)Format : Advanced forensic image - file extension is .affImage meta dataCase number : 20151120C00125Evidence number : a001Examiner : John WatsonDescription : PNY USB 2.0 Flash DriveNotes : Drive serial number AU3B110000000451Image path and file name: /images/20151120C00125/a001/20151120C00125a001.affInfo path and file name: /images/20151120C00125/a001/20151120C00125a001.infoHash calculation : MD5Source verification : offImage verification : onNo bad sectors encountered during acquisition.State: Finished successfullyMD5 hash : 4e48855119d90de80a5401427cff74feMD5 hash verified source : --MD5 hash verified image : 4e48855119d90de80a5401427cff74feSHA1 hash : --SHA1 hash verified source : --SHA1 hash verified image : --SHA256 hash : --SHA256 hash verified source: --SHA256 hash verified image : --Image verification OK. The image contains exactly the data that was written.Acquisition started : 2015-11-20 22:03:11 (ISO format YYYY-MM-DD HH:MM:SS)Verification started: 2015-11-20 22:13:21Ended : 2015-11-20 22:15:06 (0 hours, 11 minutes and 54 seconds)Acquisition speed : 25.01 MByte/s (0 hours, 10 minutes and 10 seconds)Verification speed : 146.72 MByte/s (0 hours, 1 minutes and 44 seconds) ` Of particular value is the MD5 hash for the source and image. The matching hash verifies forensic integrity of the image. The hash created by Guymager, whether you choose to use MD5, SHA-1, or SHA-256, is a hash of the volume - in this case, the disk /dev/sdc.In order to maintain chain of custody, you also need to create a hash of the image file. This hash will not be the same as the hash of the volume saved in the Guymager .info metadata file with your identification and other case management information.That hash verifies the integrity of the imaging process, but now that you have the image file, you'll want to be able to make other copies of it. You can verify the integrity of your image file and the working copies you make for analysis. In any court case, the copy you will be required to make for opposing counsel, by making a hash of the image file itself.You can create an MD5 hash in Linux by using the md5sum command line tool. Run the command as root, or in a Debian-based distribution, using sudo:` md5sum /images/20151120C00125/a001/20151120C00125a001.aff `Copy the resulting hash to a file and identify it. The algorithm is not being used for confidentiality but for verification of integrity, so it doesn't really matter which algorithm you use.The main point is to get a good digital fingerprint with which to verify the integrity of any subsequent copy you make. Save the hash to a text file in the same directory as the image file and its Metadata file. After doing so, you can use ordinary copy utilities in the GUI or at the command line to make additional copies of the image file. For each copy calculate a hash using the same algorithm to verify its integrity.The other parts of the .info file created are also instructive. Review them to learn more about what Guymager is doing under the hood. Guymager has recorded all of the case management data for the image and the technical characteristics of the acquisition process including its speed and state.This concludes the tutorial on creating a forensic disk image using the Guymager utility. In subsequent tutorials, I'll show how to mount and use the forensic disk image for investigative purposes.