
TL;DR
Throughout the day, I had some infuriating internet outages that forced me to create persistent ssh tunnels with autossh (Linux only), so I can get my tunneled connection back when Cox goes back up.We are covering 5 different ways to use a double TCP-to-Reverse-SSH tunnel productively:
- Remote Access To A Linux Machine at Home
- Remote Access To Your Nessus Web Application Scanner
- Remote Access To A Windows 10 Password Cracking Machine
- Diagnosing ISP outages
- Controlling all of this via your cell phone using JuiceSSH, and even perform penetration tests/red teaming!
Thanks to the aid of an old friend who used to work at Cox, he pointed out that the issue lies “upstream,” that is, the fault of the Internet Service Provider. I will cover creating a reverse tunneled local webpage from the actual cable modem, just for him to take a look at a diagnose the error codes in this article.In the meantime, I managed to find a method to remote-control the Nessus web app scanner by creating a reverse tunnel pointing to host a webpage on my Kali Linux VM locally.All of this is accessible by my phone’s web browser and my favorite SSH client app for Android, JuiceSSH. In other words, I can hack things with my phone strong WITHOUT a NetHunter device.
Now you are going to need the following things:
- A Virtual Private Server with a publicly reachable IP address. I recommend Vultr because of their insanely low prices (throughout all of the remote-controlling of my System76 laptop with my phone, I am ending the month with an invoice of around $3.50) https://www.vultr.com/
- A Linux distribution of some sort. I run a Ubuntu 18.04 host OS with Kernel-based Virtual Machine (KVM) running Kali Linux
- Access to the commands autossh, ssh, socat, netcat, and netstat. Autossh may not be installed, install it with sudo apt-get update && sudo apt-get install -y autossh)
- Installation of the JuiceSSH app on your Android phone or some SSH client https://juicessh.com/
The difference between SSH tunneling using the SSH command, vs. the AutoSSH command, is once the tunnel “breaks” because of an internet outage, it can’t be restarted without some monitoring script written in bash or python. AutoSSH for Linux solves that trouble for us by monitoring the status of the reverse tunnel command and then immediately attempting to reestablish that connection whenever possible.For the sake of simplicity (because I apparently “get people lost” quickly), I excluded public key authentication UNTIL you can grasp the basics. Now, tunneled cleartext passwords are extremely dangerous.Especially if someone has compromised your VPS jump server and remotely ran a packet capture or happened to be sniffing the same network that you are on if your phone is connected to wifi.At the end of the article, I will show you how to switch to public/private key-based authentication so you can apply the commands and methods that you learned into logging in more securely.Now before you start, make sure you open a Vultr account or Amazon AWS Account and can log in securely using whatever method they chose. This lesson requires a fundamental understanding of sudo, chmod, chown, ssh-keygen commands. And you can take your time learning this as you do.I learned these commands faster because of my pressure to pass the Offensive Security Certified Professional Exam this coming Sunday. I needed a way to remote control my penetration testing laptops/servers while on-the-go to take care of life matters. All with the power of my phone and a single app, JuiceSSH.
Building a Tunnel to Remotely Access Your Linux Machine
From now on, the term VultrJumpServer is referring to the PUBLIC IPv4 address of whatever VPS you spun up with SSH enabled like 69.22.54.65. It could be anything that your provider gave you, but I sure as hell am not given you my jump servers IP.From your Ubuntu 18.04, Host generate your keys
sudo sussh-keygen
Then copy the keys to your Vultr VPS's authorized_keys file
ssh-copy-id root@vultrJumpServer
Now run a persistent autossh process
autossh -Nf -M 10984 -o "PubkeyAuthentication=yes" -o "PasswordAuthentication=no" -i /root/.ssh/id_rsa -R 8443:127.0.0.1:22 root@vultrJumpServer
Now we have a VPS server that has a port remotely bound on 8443, that points to our SSH service. Make sure to run
service ssh start
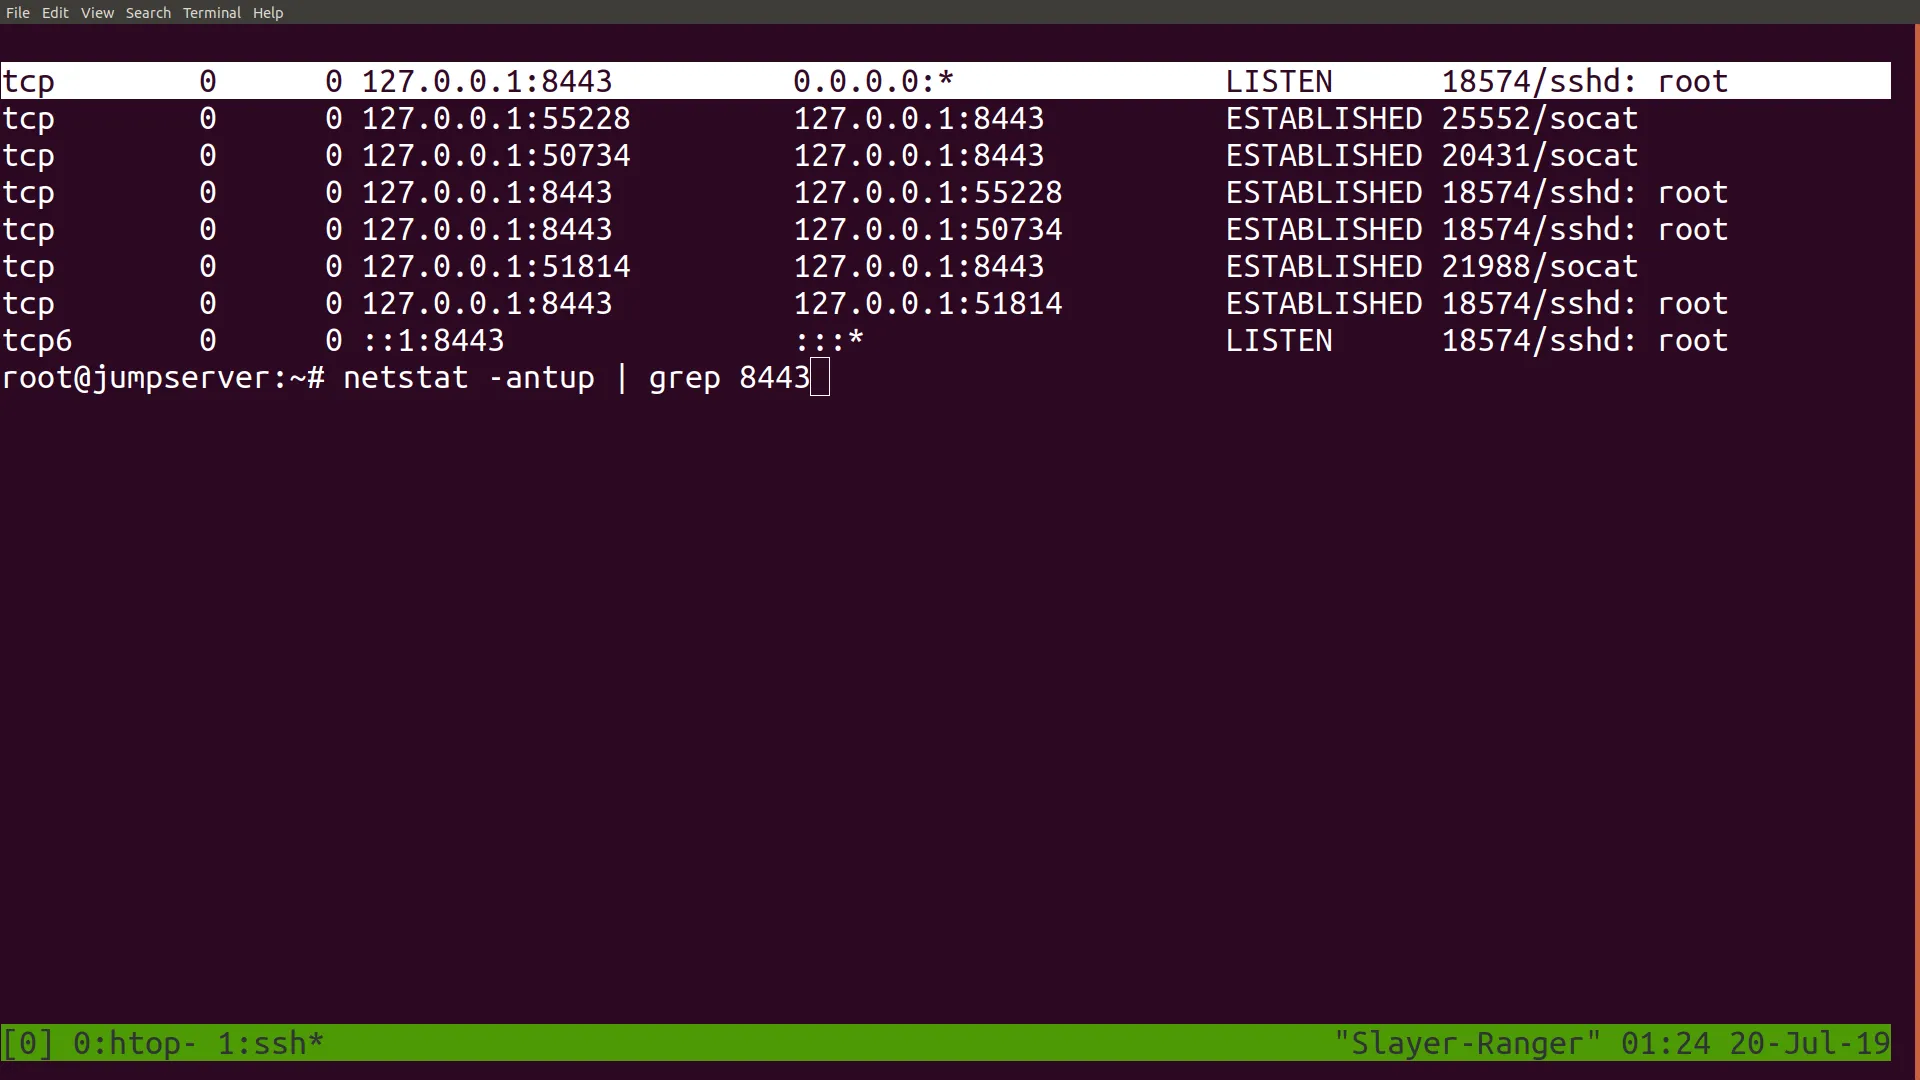
To ensure that the sshd is ready to be contacted for remote login.Then log in to your remote jump server with ssh and ensure that port 8443 has been bound remotely onto your jump server with the netstat -antup | grep 8443 command
Now you can already login back into your Linux box at home with the command ssh root@localhost -p 8443; however, that requires one to first login to the jump server. If you want immediate remote access, you want to connect to a port that your public IP will allow you to forward to 8443. Since the process that bound to port 8443 is a root process, only a root user of the server may be allowed to use that tunnel.he solution to this is to start a second process as root that forwards any inbound connections on that port to root@vultrJumpServer:8443. You use socat running in the background to do this.First, open a screen session
screen -S socat1
Then within that session create a publicly reachable port that forwards to port 8443
socat TCP4-L:8080,reuseaddr,fork tcp4:127.0.0.1:8443
Then detach from session so the process continues to run with CTRL+[A]+[D];Now test this by connecting to your public IP on port 8080, and you should receive this prompt.

At this point, you can skip right to installing JuiceSSH from the app store and connecting to your home Linux machine through that tunnel.
Building a Tunnel to Remotely Access the Nessus Web GUI
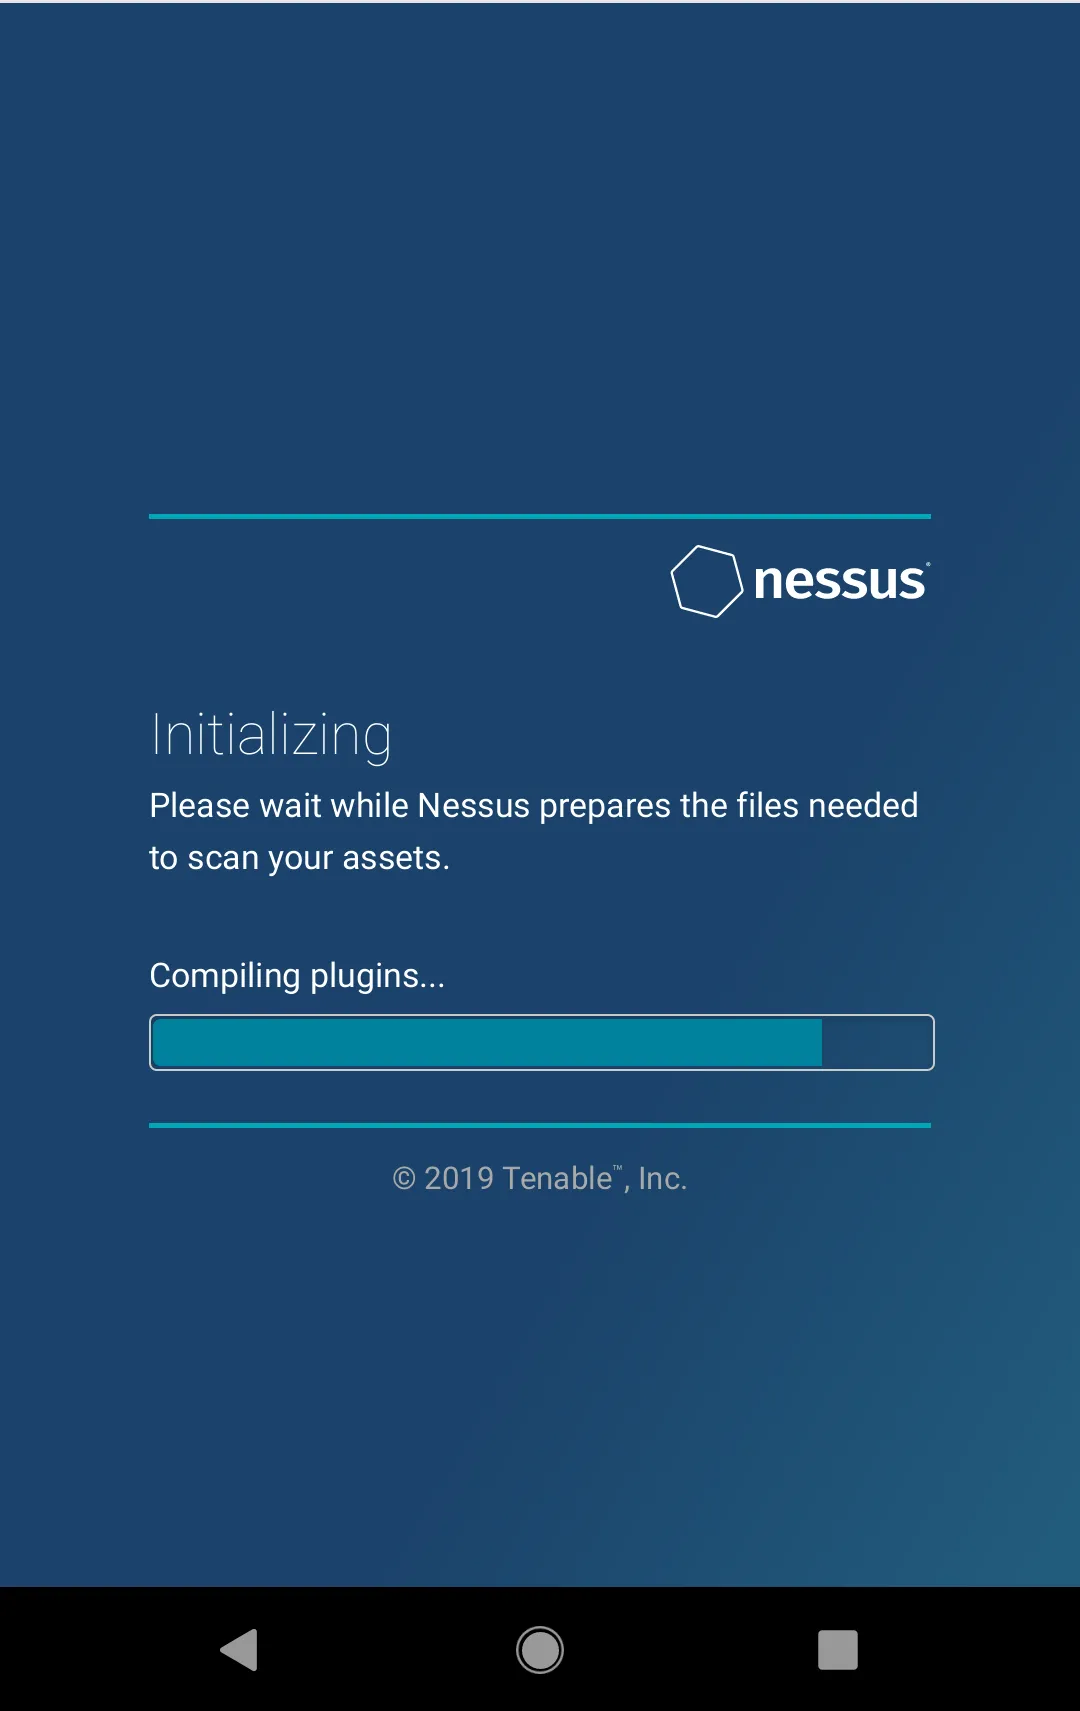
I learned that configuring and installing Nessus is a pain that takes around half a day to configure fully. It dangerously uses up a lot of CPU resources as it’s installing its plugins and completely stalls my Kali Linux VM. Which has four-logical cores assigned to it and 8192MB of RAM allocated to it.Instead, I decided to go outside and get something else done (archery, picking up packages, going to meetings) instead of moping around at home.Now I installed Nessus using the .deb file from this location https://www.tenable.com/downloads/nessus.To install it
cd /root/Downloadsdpkg -i nessuspkg.debservice nessusd start
If you ran netstat -antup | grep 8834 ,you would find the web GUI local listener port on 8834 running.Now, repeating the process, we are going to remotely bind our Nessus Web GUI to a remote VPS and then have a socat proxy forward connections to that port, ultimately reaching our local Nessus installation.
autossh -Nf -M 10985 -o "PubkeyAuthentication=yes" -o "PasswordAuthentication=no" -i /root/.ssh/id_rsa -R 8081:127.0.0.1:8834 root@vultrJumpServer
Once again, you log back into your jump server and verify that the tunnel is created with the netstat -antup | grep 8081 command.With that confirmed, you then build a public-facing port, this time port 81, to forward to port 8081 on the jump-server
screen -S socat2socat TCP4-L:81,reuseaddr,fork tcp4:127.0.0.1:8081CTRL+A+D
Now, if you were to navigate to your jump servers public IP address publicly, make sure you enter it as, for example, if 69.22.54.65 is your Vultr IPv4 address then on your phone browser.
https://69.22.54.65:81/
And it should redirect you back to your Nessus installation at your home. Note that the Nessus scanner server requires HTTPS and cannot be connected to via HTTP.
Building a Tunnel to Remotely Access Your Windows GPU Password Cracker
This is a recycling of one of my old articles!Previously, we have covered reverse SSH tunneling on a compromised Windows machine to a proxy server with a public IP address that we own to reach the Remote Desktop Protocol Port.Now I just happened to have a spare laptop lying around with a dedicated video card that’s just collecting dust since I bought my new System76 laptop. (I bought it because my previous MSI’s has a BIOS poorly written to support Linux installations)
Reachable with a public IP
Now you have many choices of VPS Infrastructure as a Service provider that you can choose from,
- Amazon Web Services EC2 Cloud
- DigitalOcean Droplets
- Linode
- Vultr
- Rackspace
- Google Compute
It’s up to you on which one you choose. But I am migrating from Amazon AWS over to Vultr due to better pricing for my uses. Since I don’t need a full-blown Kali Linux mega-server running 24/7 and being charged by the hour.But be sure to sign up for one of these services first and spin up a Linux installation of your choice, either Kali, Debian, or Ubuntu.I am choosing Kali Linux despite its SYSTEM-level root by default because I have different motives than merely configuring a “jump box” to access my machines at home.I also needed:
- A general-purpose and easily configurable proxy server
- A publicly reachable IP
- A means to bypass firewall restrictions on compromised machines during a pentest by constructing a reverse SSH tunnel
- A launch repository for “malware” and pentesting tools such as plink.exe, klogger.exe, nishang (pronounced ni-shong, or “you escalate” in Chinese), No-PowerShell, BloodHound/SharpHound, rpivot.exe (which creates a unique, reversed Dynamic SOCKS proxy rather than the traditional forward Dynamic SSH SOCKS4 proxy, deployable on machines without OpenSSH installed such as older Windows machines)
- A machine with a reachable DNS address for data exfiltration via iodine and dnscat2
- A relatively sturdy host to host my Apache Tomcat 9 installation, which I consider to be a superior Java Web Application. Hosting platform given its support for Python, Jython, Java, Ruby, (All of them in the form of Servlets) and Java Server Pages which can be dynamically generated and can be embedded with malicious javascript (including service workers) to serve as launchers of drive-by malware
(I have a sub-project that I am working on, involving the instant deployment of drive-by Android malware by slipping a Dalvik Executable (.dex file) into a mobile browser cache in a onLoad() event, and using service workers to carve it back out and execute it like a Android App, a B-Variant targeting iOS iPhone devices using Swift/Objective-C/Cocoa based microkernels is also in the works).
"I excluded JBoss because JBoss is a full-stack J2EE enterprise-level deployment of Java, and it will add too much overhead and cost and unneeded features to a server that is not robust enough to support it."Let's assume that you have a public IP address granted to you from Los Angeles of 68.122.55.96 after spinning up your VPS
Let's separate the two machines as follows
TargetBox = The old gaming laptop you want to repurpose as a password cracker (and probably not worth anything else since you are too busy taking the PwK course and the piece of crap is Linux Hostile)JumpBox = The Virtual Private Server with a publicly reachable IP address you are spinning up
TargetBox: Follow this guide to enable RDP on Windows 10
https://www.groovypost.com/howto/setup-use-remote-desktop-windows-10/ but uncheck the Allow connections only from computers running Remote Desktop with Network-level Authentication because the rdesktop command is not compatible with Windows’ newer SSP/Kerberos authentication.Check that the service is enabled with the command
netstat -an | findstr LISTENING
And look for port 3389
TargetBox: Now install the OpenSSH library and Windows Linux Subsystem by following these guides.
https://www.howtogeek.com/336775/how-to-enable-and-use-windows-10s-built-in-ssh-commandshttps://www.onmsft.com/how-to/how-to-install-windows-10s-linux-subsystem-on-your-pcThe latter will give you access to the bourne-again shell, which provides you with useful commands such as grep, sort, uniq, cat, and for-loop operations as well as being able to run Windows executables still.
JumpBox: Now configure your remote VPS with a public IP for root-level logins, which is required for the creation of SSH tunnels.
First, edit the file
nano /etc/ssh/sshd_config
Then change it all to this configuration
Port 22Protocol 2HostKey /etc/ssh/ssh_host_rsa_keyHostKey /etc/ssh/ssh_host_dsa_keyHostKey /etc/ssh/ssh_host_ecdsa_keyHostKey /etc/ssh/ssh_host_ed25519_keyUsePrivilegeSeparation yesKeyRegenerationInterval 3600ServerKeyBits 1024SyslogFacility AUTHLogLevel INFOLoginGraceTime 120StrictModes yesRSAAuthentication yesPubkeyAuthentication yesIgnoreRhosts yesRhostsRSAAuthentication noHostbasedAuthentication noPermitEmptyPasswords noChallengeResponseAuthentication noX11Forwarding yesX11DisplayOffset 10PrintMotd noPrintLastLog yesTCPKeepAlive yesAcceptEnv LANG LC_*Subsystem sftp /usr/lib/openssh/sftp-serverUsePAM yesPermitRootLogin yesPasswordAuthentication yesClientAliveInterval 180UseDNS no
And give a password for root
passwd root
TargetBox: Now from the Windows powershell Administrator command-line
ssh -Nf root@68.122.55.96 -R 443:127.0.0.1:3389
-Nf tells the ssh client to run in the background and keep the connection open-R states a reverse bind port to be bound to the public proxy serverThe statement 443:127.0.0.1:3389 remotely binds to the proxy server, port 443 to your gaming laptop at port 3389
JumpBox: Login to your proxyserver and setup socat to forward port 80 (run as root) to localhost:443
Check that 443 has been bound remotely to the JumpBox by logging into it and running the command
netstat -antup | grep 443
Once you are certain that a ssh/sshd process is bound and established, our first part of the tunnel is done. Now we need to configure our socat tunnel
socat TCP4-L:80,reuseaddr,fork TCP4:127.0.0.1:443
Without having a root socat session reverse-proxying to the bound port on 443, you would not be able to rdesktop remotely by your VPS's public IP (only locally by using VNC to access the proxy server's GUI).Security-wise you might want to put something between this and the RDP authentication prompt. You can further secure this connection from onlookers scanning for vulnerable hosts by requiring certificate authentication as a socat option (by generating it via openssl).I am literally trying to dumb this down as much as possible (people tell me I confuse them already), so that topic is outside the scope of this article. Plus, you can collapse the tunnel by killing the ssh session on that gaming laptop or on the server.You: Now, from your Kali Linux machine (or Ubuntu or whatever you use), login to it through your publicly accessible proxy server to reach your Remote Desktop Protocol Prompt
rdesktop 68.122.55.96:80 -f
Now install your required NVidia drivers and download and install the hashcat binaries and you are donehttps://hashcat.net/hashcat/You're Done!If you are using Windows instead, then you simply use your Remote Desktop Client and enter 68.122.55.96:80 as the addressEnjoy your remotely accessible cracking machine WITHOUT having to rent an expensive Amazon AWS P2 GPU Instance by putting your old gaming laptop to work and paying the minimal cost with a publicly reachable reverse proxy server
List of basic hashcat commands:
Crack unshadowed Linux hashes
./hashcat64.exe -a 0 -w 4 -m 500 hashes.txt wordlist.txt
Crack NTLM/SAM hashes
./hashcat64.exe -a 0 -w 4 -m 1000 hashes.txt wordlist.txt
Crack NTLMv2 hashes
./hashcat64.exe -a 0 -w 4 -m 5600 hashes.txt wordlist.txt
Crack WPA2-PSK hashes
First, get cap2hccapx from hashcat-utils:https://hashcat.net/wiki/doku.php?id=cracking_wpawpa2Run the cap2hccapx.exe on your .cap file you got from Airodump-ngThen,
./hashcat64.exe -a 0 -w4 -m 2500 wpa.hccapx wordlist.txt
Possible Issues:
- Connection either hangs or gets rejected (check your IaaS provider’s firewall settings, your internal UFW easy-mode firewall, and your iptables configuration)
- The connection is laggy, with slow mouse and keyboard response (employ compression on the RDP session with the rdesktop -z parameter, if you need to double it up, then change the initial reverse tunnel command with an ssh -CNf with -C to employ compression as well and an optional number from 1 to 9 to dictate level of compression, possible horrible graphics warning!)
- I cannot connect to port 80 on my VPS’s public IP address (in this example, we have a PROXY forwarding from port 80 to 443 on the intermediary proxy server, for remote RDP SSH tunneled connections, you must have a service (that’s why I said using socat) running as ROOT proxying to the reverse SSH bound-port, otherwise, only the local root user of the VPS is able to use the tunnel with rdesktop 127.0.0.1:443
Building a Tunnel to Let a Friend Who Knows About ISPs (Cox Cable) Diagnose Your Internet Issues (dangerous)
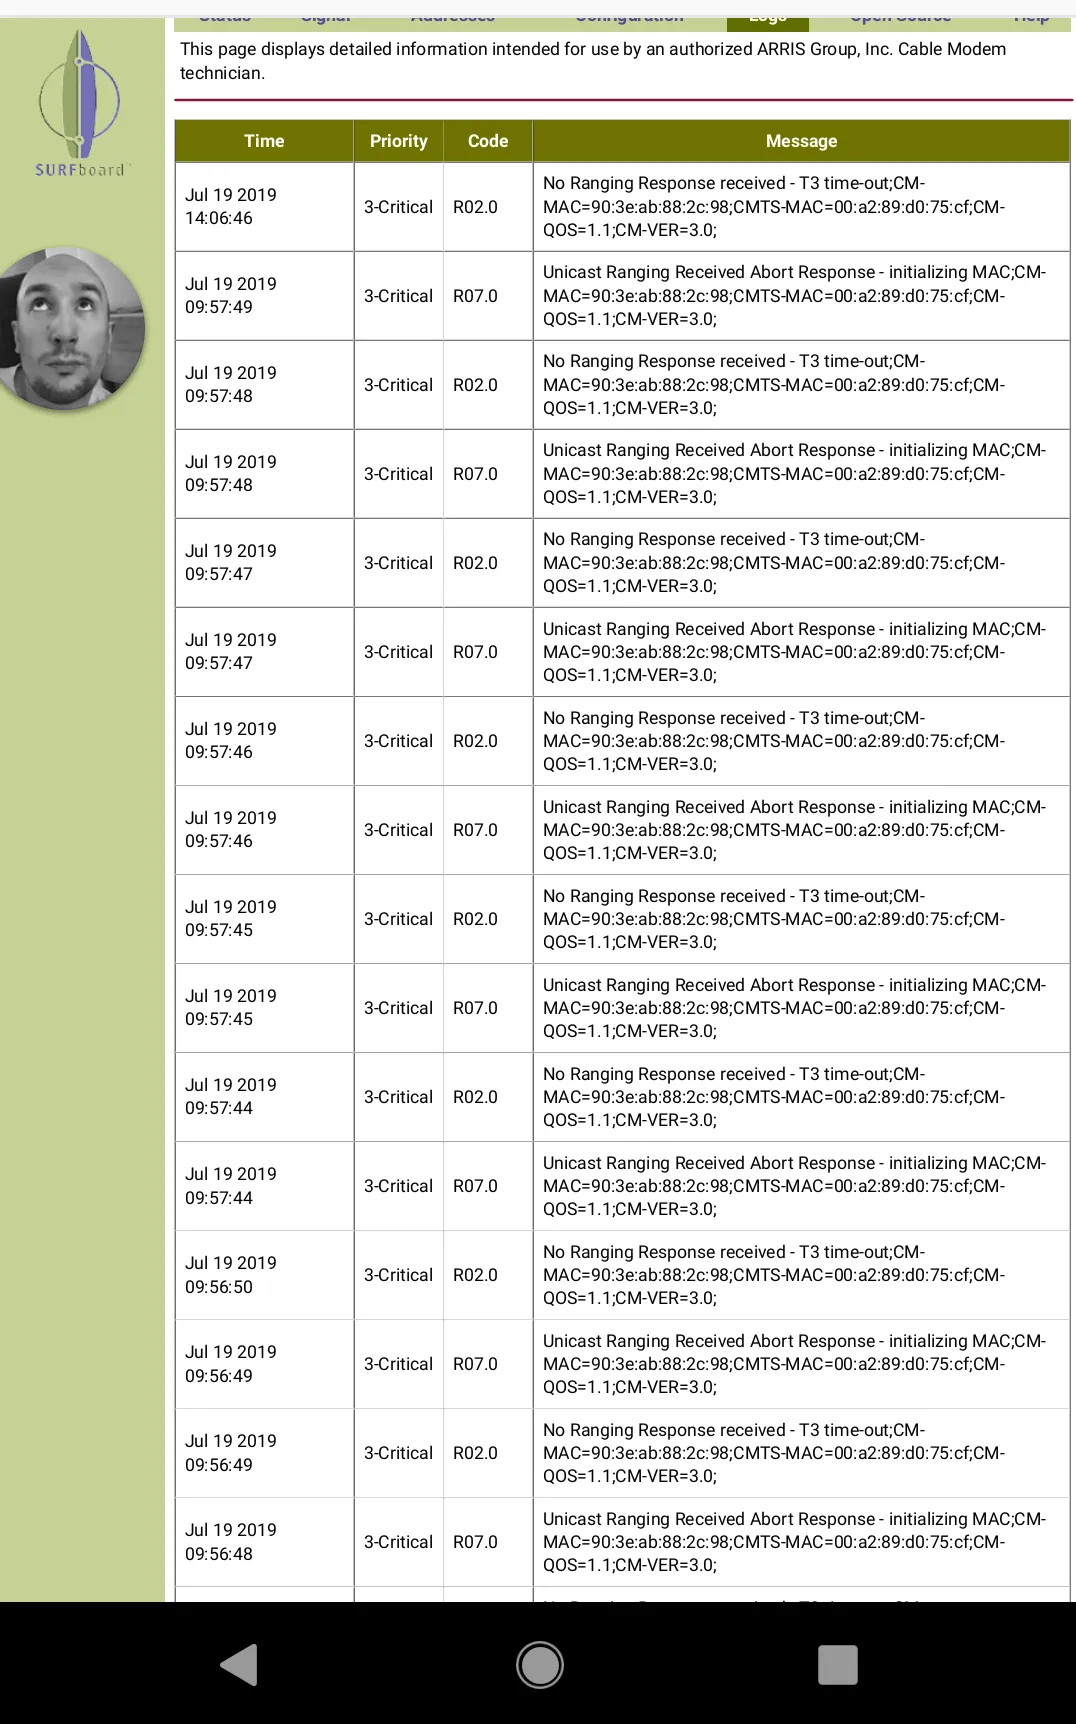
I only did this for a brief moment in time. It effectively gave my friend who used to work at Cox, full access to the logs of the cable modem (not the router). But the information derived proved useful in determining that my internet outages were actually from UPSTREAM, as in, something went wrong with the Metropolitan Area Network (MAN) or Wide Area Network (WAN).
To let my friend see what is going on, I first created a reverse tunnel pointing to my LAN’s cable modem status. For my cable modem, the IPv4 address for the Status Panel webpage is https://192.168.100.1:80, so I had to redirect it to a public IP that is publicly reachable.This time I chose to remotely bind port 4444 on the jump server to my local cable modem Status Panel. Yes, this means through reverse tunneling, you can point the tunnel to OTHER IP addresses and ports within your LAN!
ssh -Nf root@vultrJumpServer -R 4444:192.168.100.1:80
Then I logged onto the vultrJumpServer and created a socat tunnel listening on port 82, redirecting to my cable modem status.
socat TCP4-L:82,reuseaddr,fork tcp4:127.0.0.1:4444
I then presented to him a webpage, assuming my public IP on the jump server was 69.22.54.65, then it would be rendered at
http://69.22.54.65:82
Given the amount of personal intel I noticed it logged about my network traffic, including the Cable Modems MAC address, I immediately asked him to notify me when he is done so I can promptly collapse the tunnel with the commands (on your Vultr Jump Server).
fuser -k 82/tcp 4444/tcp
But thanks to his help, we concluded:
- There is no issue with the router, which is right after the cable modem
- The issue appears to lie UPSTREAM https://pickmymodem.com/cable-modem-t3-and-t4-timeouts-error-messages-and-how-to-fix-them/
- It might be helpful to add a compressor connector to the end of the RG6 Coaxial Cable that plugs into my cable modem to better eliminate signal interference from nearby electronic devices.
Putting It Into Practice: Logging in with JuiceSSH on your Anroid Phone
First, install JuiceSSH on the Android Play App Store.In the app, create a new identity. This is basically your auto-login. Your username is your user for the Linux box’s SSHD server. Whatever you use to ssh username@localhost. Then select to enter a password (dangerous) or use an RSA private key instead.
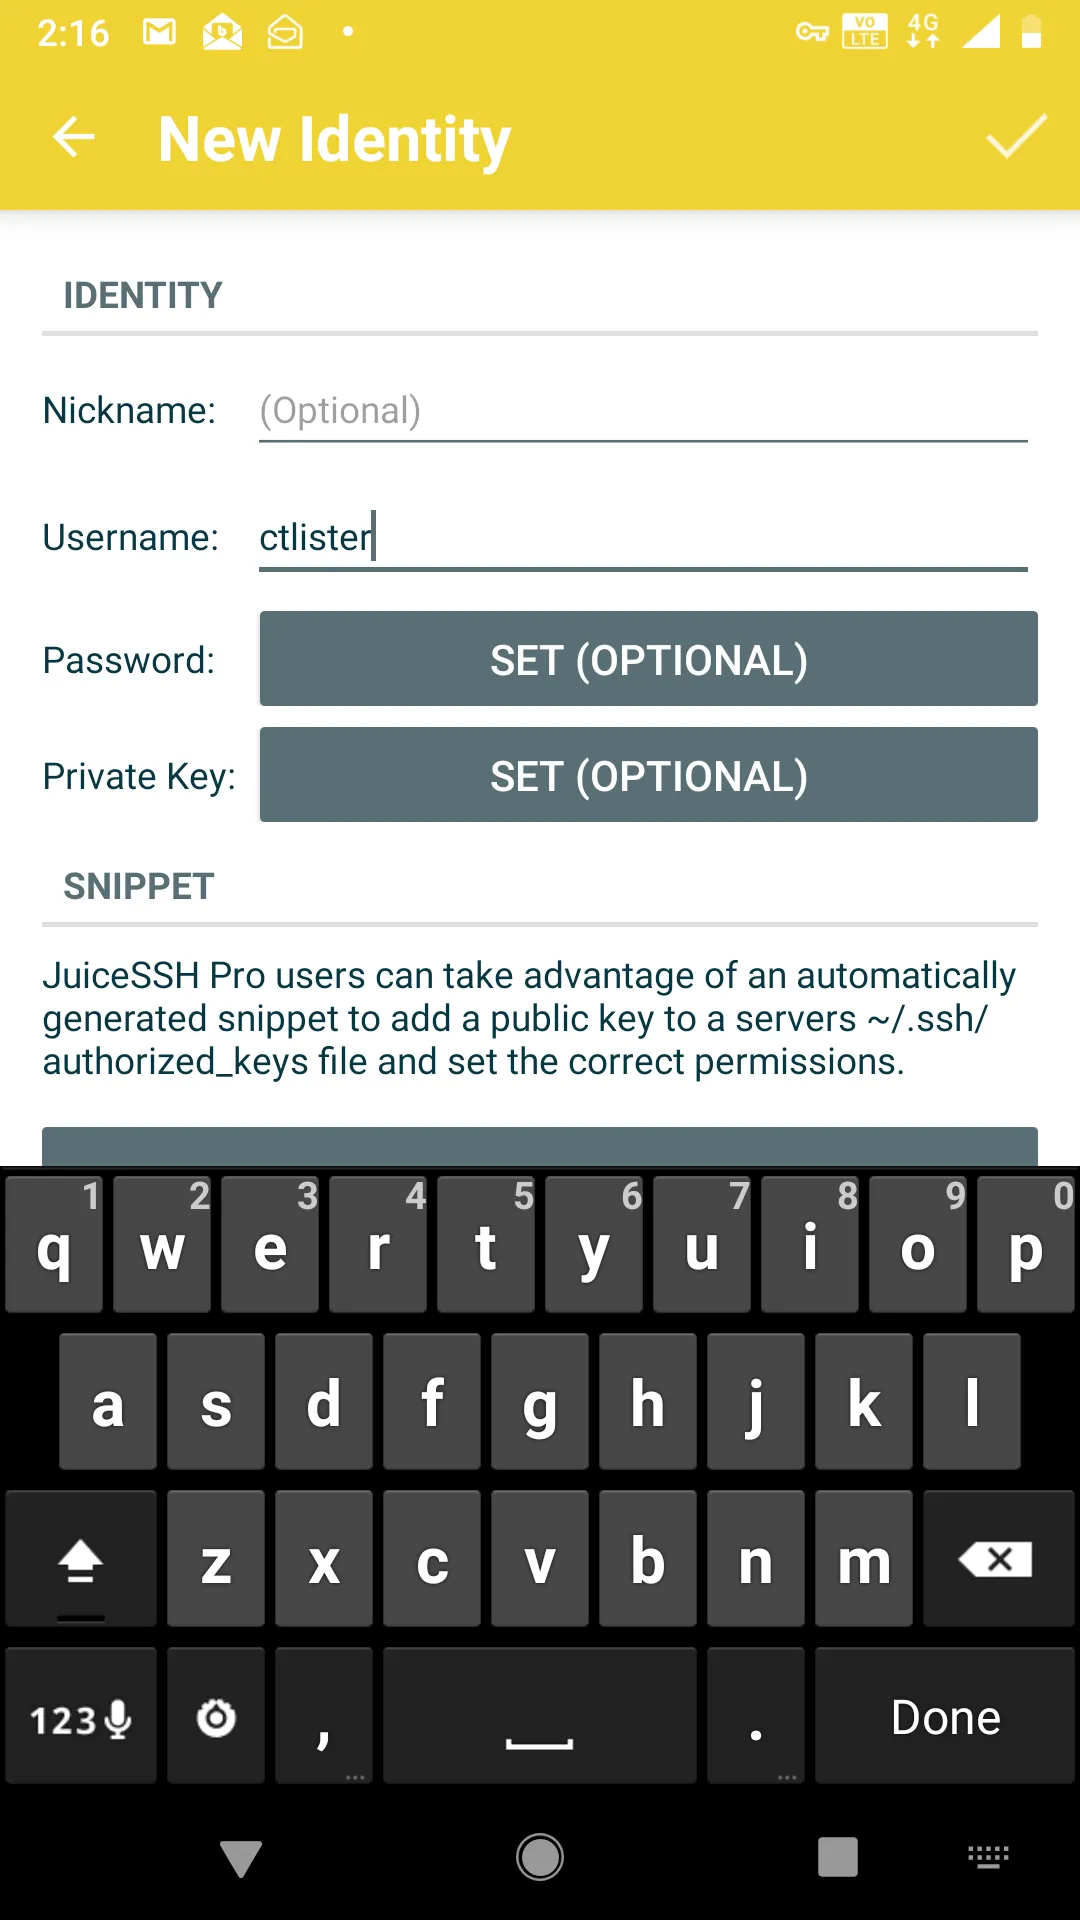
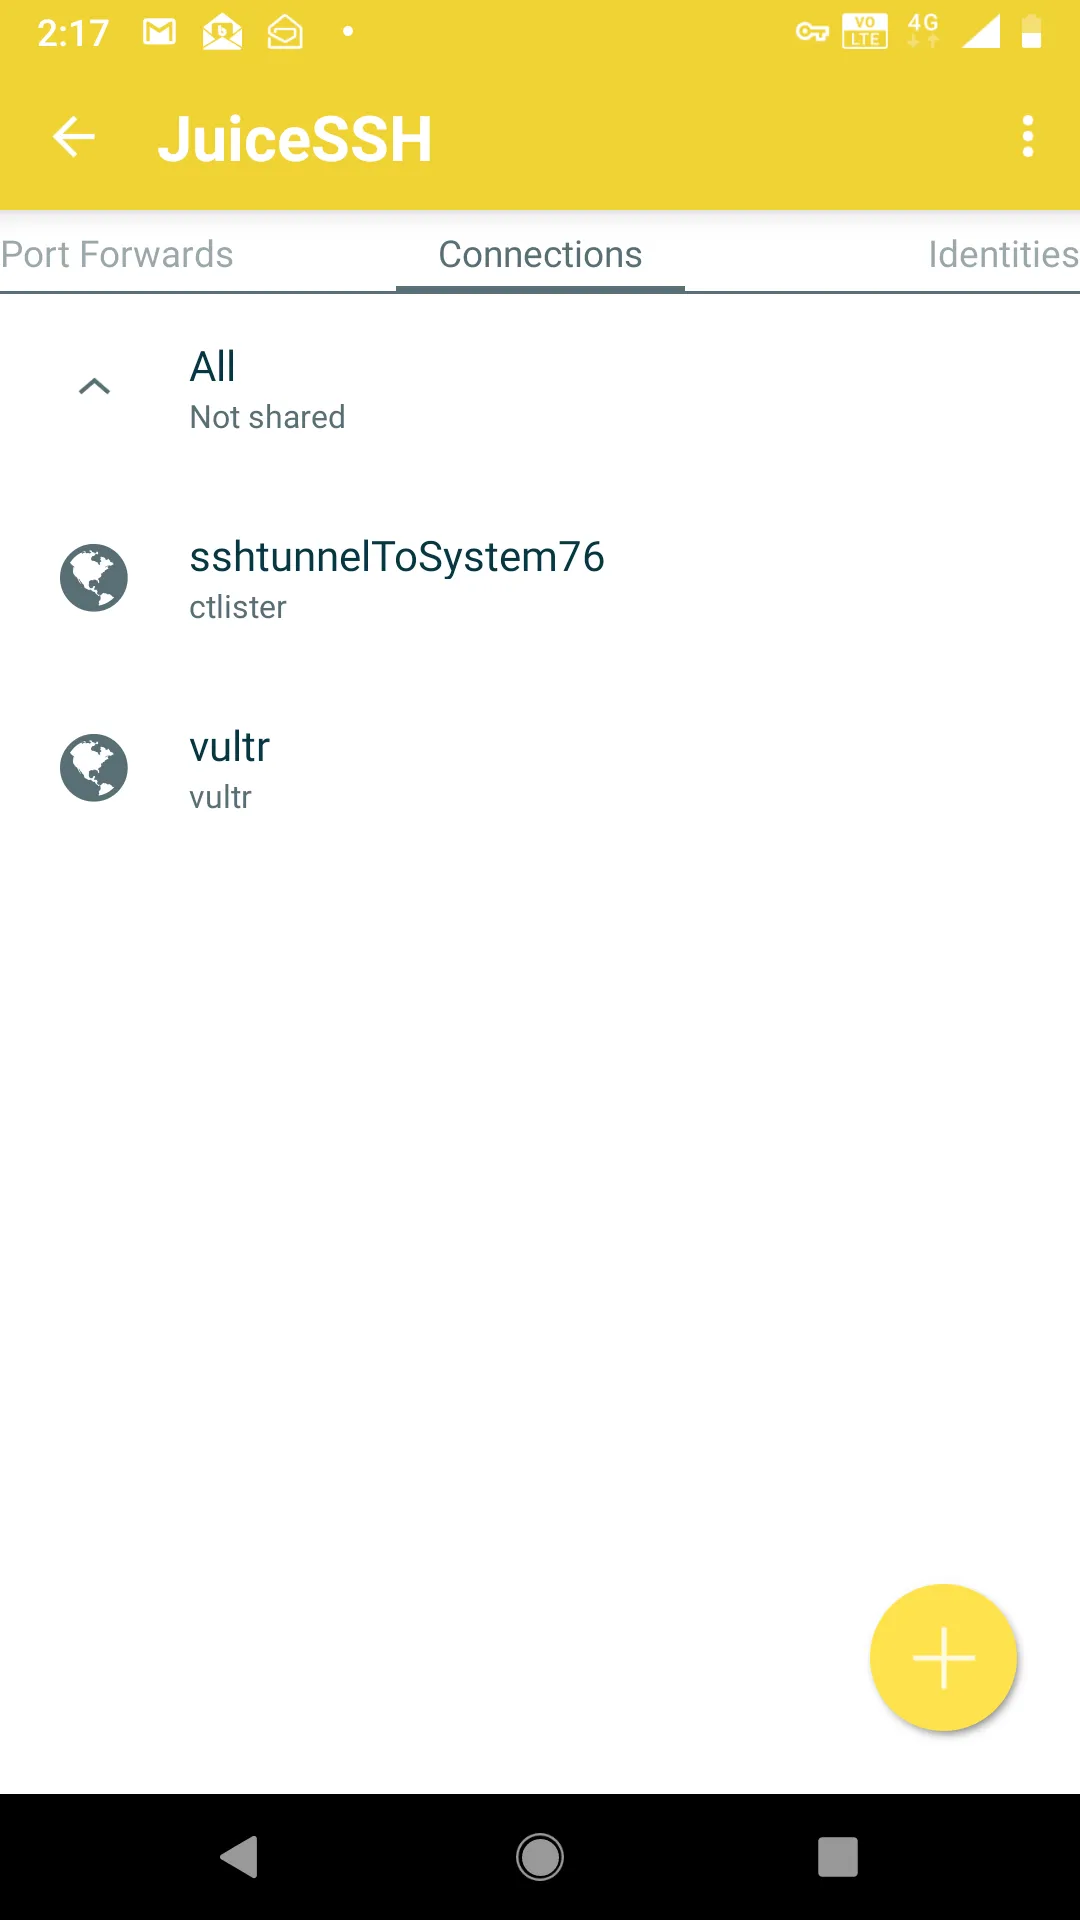
Now add a new connection, and enter the IP address and port of your VULTR JUMP SERVER and the port that is redirecting to your home Linux Machine’s SSH listener. In our previous example, I explicitly created an outbound port with socat listening on port 8080, which points to localhost:8443, which then, in turn, leads to my home Linux machine on port 22.

Click the checkmark on the top right to save the settings and make sure that you are using the correct identity for connection.At this point, connecting to your home Linux box is as easy as pressing the button, I called it, sshtunnelToSystem76, which is my Linux laptop.
If all goes well, you should see this.
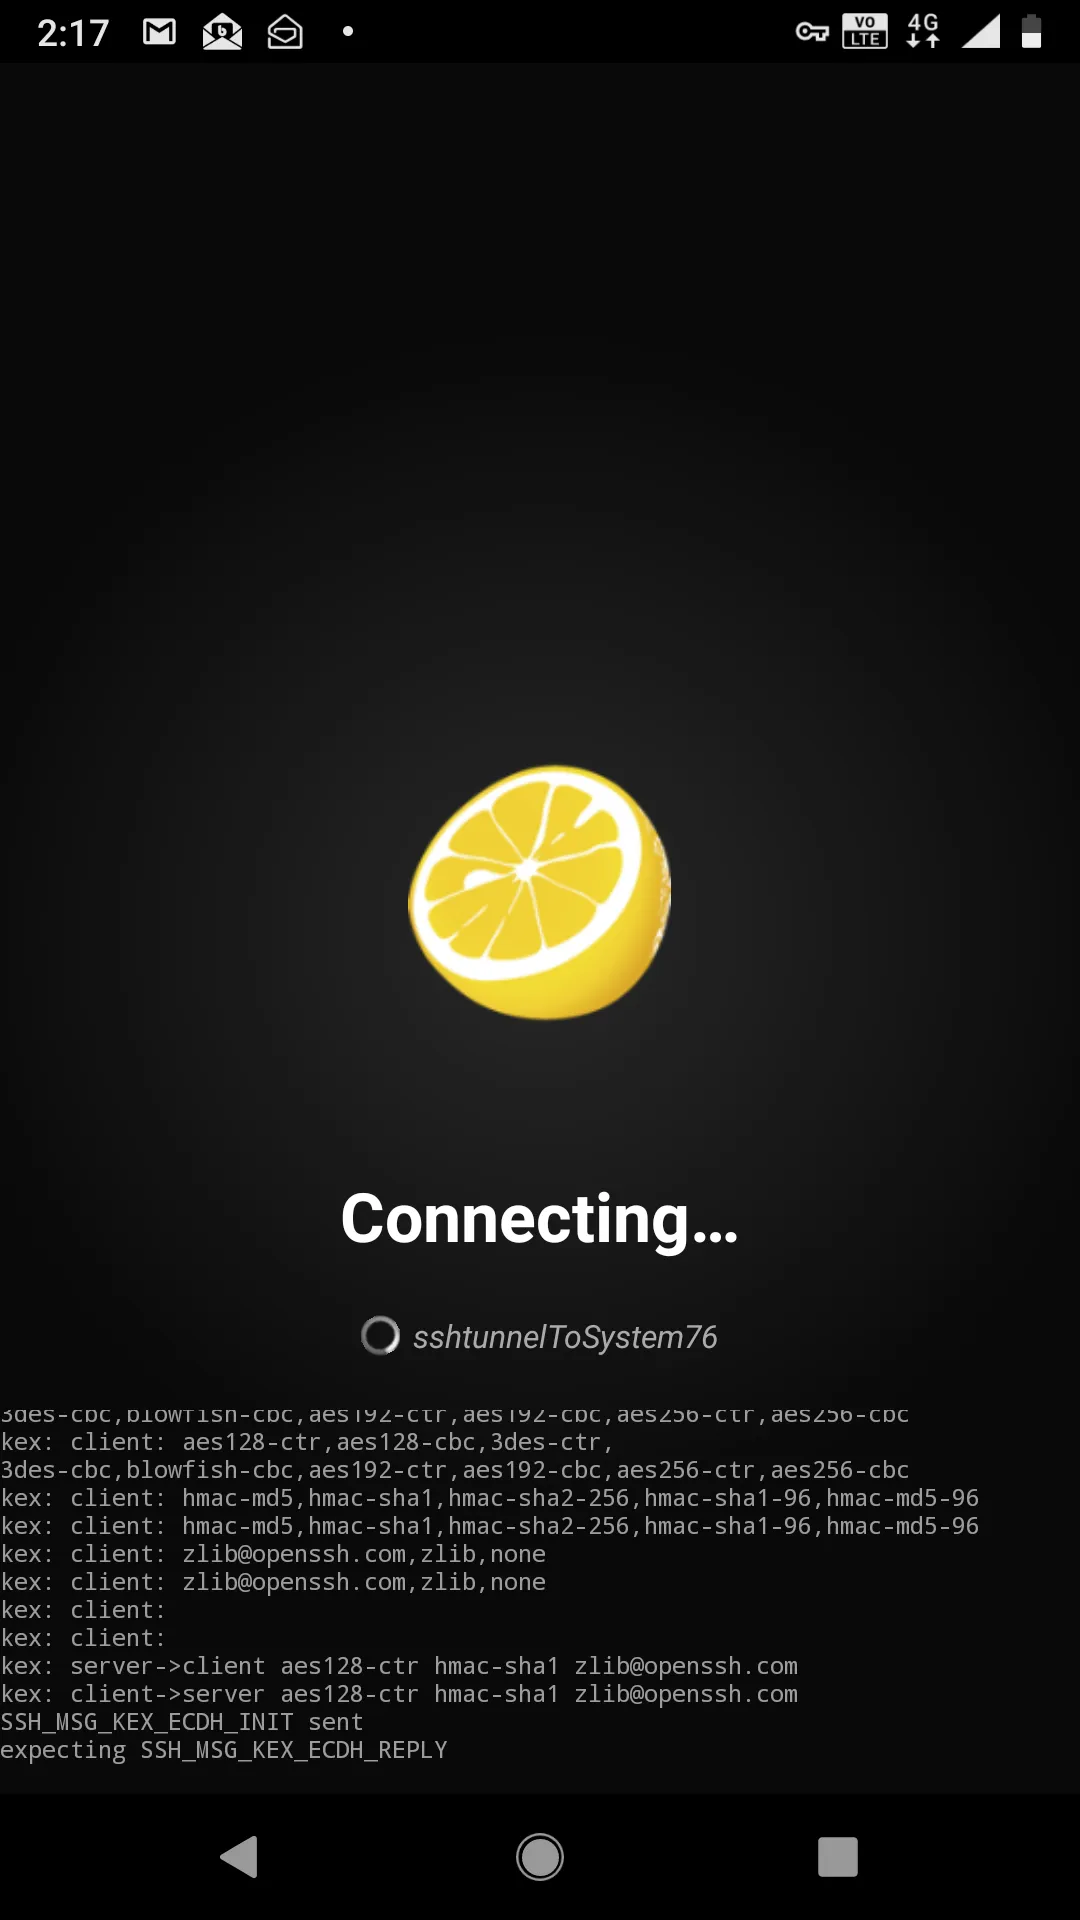
And then you will drop into the shell, for me, it’s user ctlister that is the username of localhost that accepts the connection.Now I have full control of my laptop with my cell phone. If I wanted to do some penetration testing with my cell phone remotely, like the offsec labs, I ssh root@kali or, more precisely, since the IP address in KVM of 192.168.122.84 is saved on my /etc/hosts file, it is actually ssh root@192.168.122.84 from this shell.And there you have it. I can do penetration tests and hack WITHOUT having a specific Nethunter Tablet or phone. https://www.kali.org/kali-linux-nethunter/
Switching to Public/Private Key Authentication
For safety reasons, you definitely want to switch over to key-based authentication. Remember how we generated both a private and public key with the ssh-keygen command?We can now implement that in JuiceSSH, which accepts only private RSA keys. Simply send the id_rsa file to yourself, for me it is located at /home/ctlister/.ssh/id_rsa. Copy this and email it yourself or something.
xclip -selection clipboard /home/ctlister/.ssh/id_rsa
Then send it to yourself. Go back to your ctlister identity on JuiceSSH and select Private Key
Then select the Paste tab and paste the entire RSA key within it and save it with the checkmark on the right.
Start Learning Today :
Now, the final step is to edit your /etc/ssh/sshd_config file and restart the sshd daemon.
nano /etc/ssh/sshd_config
And then change
PasswordAuthentication yes
To
PasswordAuthentication no
Then CTRL+X and Y to save it.Then restart your SSH listener
service ssh restart
Now, you have the ability to
- Push-button login back to your Linux box
- Hack using just your cell phone without rooting it or installing the Nethunter ROM (by remote-controlling Linux machines Hosts and Guests in KVM Hypervisors.
- Run maintenance on your home network
The Open Worldwide Application Security Project (OWASP) is a community-led organization and has been around for over 20 years and is largely known for its Top 10 web application security risks (check out our course on it). As the use of generative AI and large language models (LLMs) has exploded recently, so too has the risk to privacy and security by these technologies. OWASP, leading the charge for security, has come out with its Top 10 for LLMs and Generative AI Apps this year. In this blog post we’ll explore the Top 10 risks and explore examples of each as well as how to prevent these risks.
LLM01: Prompt Injection
Those familiar with the OWASP Top 10 for web applications have seen the injection category before at the top of the list for many years. This is no exception with LLMs and ranks as number one. Prompt Injection can be a critical vulnerability in LLMs where an attacker manipulates the model through crafted inputs, leading it to execute unintended actions. This can result in unauthorized access, data exfiltration, or social engineering. There are two types: Direct Prompt Injection, which involves "jailbreaking" the system by altering or revealing underlying system prompts, giving an attacker access to backend systems or sensitive data, and Indirect Prompt Injection, where external inputs (like files or web content) are used to manipulate the LLM's behavior.
As an example, an attacker might upload a resume containing an indirect prompt injection, instructing an LLM-based hiring tool to favorably evaluate the resume. When an internal user runs the document through the LLM for summarization, the embedded prompt makes the LLM respond positively about the candidate’s suitability, regardless of the actual content.
How to prevent prompt injection:
- Limit LLM Access: Apply the principle of least privilege by restricting the LLM's access to sensitive backend systems and enforcing API token controls for extended functionalities like plugins.
- Human Approval for Critical Actions: For high-risk operations, require human validation before executing, ensuring that the LLM's suggestions are not followed blindly.
- Separate External and User Content: Use frameworks like ChatML for OpenAI API calls to clearly differentiate between user prompts and untrusted external content, reducing the chance of unintentional action from mixed inputs.
- Monitor and Flag Untrusted Outputs: Regularly review LLM outputs and mark suspicious content, helping users to recognize potentially unreliable information.
LLM02: Insecure Output Handling
Insecure Output Handling occurs when the outputs generated by a LLM are not properly validated or sanitized before being used by other components in a system. Since LLMs can generate various types of content based on input prompts, failing to handle these outputs securely can introduce risks like cross-site scripting (XSS), server-side request forgery (SSRF), or even remote code execution (RCE). Unlike Overreliance (LLM09), which focuses on the accuracy of LLM outputs, Insecure Output Handling specifically addresses vulnerabilities in how these outputs are processed downstream.
As an example, there could be a web application that uses an LLM to summarize user-provided content and renders it back in a webpage. An attacker submits a prompt containing malicious JavaScript code. If the LLM’s output is displayed on the webpage without proper sanitization, the JavaScript will execute in the user’s browser, leading to XSS. Alternatively, if the LLM’s output is sent to a backend database or shell command, it could allow SQL injection or remote code execution if not properly validated.
How to prevent Insecure Output Handling:
- Zero-Trust Approach: Treat the LLM as an untrusted source, applying strict allow list validation and sanitization to all outputs it generates, especially before passing them to downstream systems or functions.
- Output Encoding: Encode LLM outputs before displaying them to end users, particularly when dealing with web content where XSS risks are prevalent.
- Adhere to Security Standards: Follow the OWASP Application Security Verification Standard (ASVS) guidelines, which provide strategies for input validation and sanitization to protect against code injection risks.
LLM03: Training Data Poisoning
Training Data Poisoning refers to the manipulation of the data used to train LLMs, introducing biases, backdoors, or vulnerabilities. This tampered data can degrade the model's effectiveness, introduce harmful biases, or create security flaws that malicious actors can exploit. Poisoned data could lead to inaccurate or inappropriate outputs, compromising user trust, harming brand reputation, and increasing security risks like downstream exploitation.
As an example, there could be a scenario where an LLM is trained on a dataset that has been tampered with by a malicious actor. The poisoned dataset includes subtly manipulated content, such as biased news articles or fabricated facts. When the model is deployed, it may output biased information or incorrect details based on the poisoned data. This not only degrades the model’s performance but can also mislead users, potentially harming the model’s credibility and the organization’s reputation.
How to prevent Training Data Poisoning:
- Data Validation and Vetting: Verify the sources of training data, especially when sourcing from third-party datasets. Conduct thorough checks on data integrity, and where possible, use trusted data sources.
- Machine Learning Bill of Materials (ML-BOM): Maintain an ML-BOM to track the provenance of training data and ensure that each source is legitimate and suitable for the model’s purpose.
- Sandboxing and Network Controls: Restrict access to external data sources and use network controls to prevent unintended data scraping during training. This helps ensure that only vetted data is used for training.
- Adversarial Robustness Techniques: Implement strategies like federated learning and statistical outlier detection to reduce the impact of poisoned data. Periodic testing and monitoring can identify unusual model behaviors that may indicate a poisoning attempt.
- Human Review and Auditing: Regularly audit model outputs and use a human-in-the-loop approach to validate outputs, especially for sensitive applications. This added layer of scrutiny can catch potential issues early.
LLM04: Model Denial of Service
Model Denial of Service (DoS) is a vulnerability in which an attacker deliberately consumes an excessive amount of computational resources by interacting with a LLM. This can result in degraded service quality, increased costs, or even system crashes. One emerging concern is manipulating the context window of the LLM, which refers to the maximum amount of text the model can process at once. This makes it possible to overwhelm the LLM by exceeding or exploiting this limit, leading to resource exhaustion.
As an example, an attacker may continuously flood the LLM with sequential inputs that each reach the upper limit of the model’s context window. This high-volume, resource-intensive traffic overloads the system, resulting in slower response times and even denial of service. As another example, if an LLM-based chatbot is inundated with a flood of recursive or exceptionally long prompts, it can strain computational resources, causing system crashes or significant delays for other users.
How to prevent Model Denial of Service:
- Rate Limiting: Implement rate limits to restrict the number of requests from a single user or IP address within a specific timeframe. This reduces the chance of overwhelming the system with excessive traffic.
- Resource Allocation Caps: Set caps on resource usage per request to ensure that complex or high-resource requests do not consume excessive CPU or memory. This helps prevent resource exhaustion.
- Input Size Restrictions: Limit input size according to the LLM's context window capacity to prevent excessive context expansion. For example, inputs exceeding a predefined character limit can be truncated or rejected.
- Monitoring and Alerts: Continuously monitor resource utilization and establish alerts for unusual spikes, which may indicate a DoS attempt. This allows for proactive threat detection and response.
- Developer Awareness and Training: Educate developers about DoS vulnerabilities in LLMs and establish guidelines for secure model deployment. Understanding these risks enables teams to implement preventative measures more effectively.
LLM05: Supply Chain Vulnerabilities
Supply Chain attacks are incredibly common and this is no different with LLMs, which, in this case refers to risks associated with the third-party components, training data, pre-trained models, and deployment platforms used within LLMs. These vulnerabilities can arise from outdated libraries, tampered models, and even compromised data sources, impacting the security and reliability of the entire application. Unlike traditional software supply chain risks, LLM supply chain vulnerabilities extend to the models and datasets themselves, which may be manipulated to include biases, backdoors, or malware that compromises system integrity.
As an example, an organization uses a third-party pre-trained model to conduct economic analysis. If this model is poisoned with incorrect or biased data, it could generate inaccurate results that mislead decision-making. Additionally, if the organization uses an outdated plugin or compromised library, an attacker could exploit this vulnerability to gain unauthorized access or tamper with sensitive information. Such vulnerabilities can result in significant security breaches, financial loss, or reputational damage.
How to prevent Supply Chain Vulnerabilities:
- Vet Third-Party Components: Carefully review the terms, privacy policies, and security measures of all third-party model providers, data sources, and plugins. Use only trusted suppliers and ensure they have robust security protocols in place.
- Maintain a Software Bill of Materials (SBOM): An SBOM provides a complete inventory of all components, allowing for quick detection of vulnerabilities and unauthorized changes. Ensure that all components are up-to-date and apply patches as needed.
- Use Model and Code Signing: For models and external code, employ digital signatures to verify their integrity and authenticity before use. This helps ensure that no tampering has occurred.
- Anomaly Detection and Robustness Testing: Conduct adversarial robustness tests and anomaly detection on models and data to catch signs of tampering or data poisoning. Integrating these checks into your MLOps pipeline can enhance overall security.
- Implement Monitoring and Patching Policies: Regularly monitor component usage, scan for vulnerabilities, and patch outdated components. For sensitive applications, continuously audit your suppliers’ security posture and update components as new threats emerge.
LLM06: Sensitive Information Disclosure
Sensitive Information Disclosure in LLMs occurs when the model inadvertently reveals private, proprietary, or confidential information through its output. This can happen due to the model being trained on sensitive data or because it memorizes and later reproduces private information. Such disclosures can result in significant security breaches, including unauthorized access to personal data, intellectual property leaks, and violations of privacy laws.
As an example, there could be an LLM-based chatbot trained on a dataset containing personal information such as users’ full names, addresses, or proprietary business data. If the model memorizes this data, it could accidentally reveal this sensitive information to other users. For instance, a user might ask the chatbot for a recommendation, and the model could inadvertently respond with personal information it learned during training, violating privacy rules.
How to prevent Sensitive Information Disclosure:
- Data Sanitization: Before training, scrub datasets of personal or sensitive information. Use techniques like anonymization and redaction to ensure no sensitive data remains in the training data.
- Input and Output Filtering: Implement robust input validation and sanitization to prevent sensitive data from entering the model’s training data or being echoed back in outputs.
- Limit Training Data Exposure: Apply the principle of least privilege by restricting sensitive data from being part of the training dataset. Fine-tune the model with only the data necessary for its task, and ensure high-privilege data is not accessible to lower-privilege users.
- User Awareness: Make users aware of how their data is processed by providing clear Terms of Use and offering opt-out options for having their data used in model training.
- Access Controls: Apply strict access control to external data sources used by the LLM, ensuring that sensitive information is handled securely throughout the system
LLM07: Insecure Plugin Design
Insecure Plugin Design vulnerabilities arise when LLM plugins, which extend the model’s capabilities, are not adequately secured. These plugins often allow free-text inputs and may lack proper input validation and access controls. When enabled, plugins can execute various tasks based on the LLM’s outputs without further checks, which can expose the system to risks like data exfiltration, remote code execution, and privilege escalation. This vulnerability is particularly dangerous because plugins can operate with elevated permissions while assuming that user inputs are trustworthy.
As an example, there could be a weather plugin that allows users to input a base URL and query. An attacker could craft a malicious input that directs the LLM to a domain they control, allowing them to inject harmful content into the system. Similarly, a plugin that accepts SQL “WHERE” clauses without validation could enable an attacker to execute SQL injection attacks, gaining unauthorized access to data in a database.
How to prevent Insecure Plugin Design:
- Enforce Parameterized Input: Plugins should restrict inputs to specific parameters and avoid free-form text wherever possible. This can prevent injection attacks and other exploits.
- Input Validation and Sanitization: Plugins should include robust validation on all inputs. Using Static Application Security Testing (SAST) and Dynamic Application Security Testing (DAST) can help identify vulnerabilities during development.
- Access Control: Follow the principle of least privilege, limiting each plugin's permissions to only what is necessary. Implement OAuth2 or API keys to control access and ensure only authorized users or components can trigger sensitive actions.
- Manual Authorization for Sensitive Actions: For actions that could impact user security, such as transferring files or accessing private repositories, require explicit user confirmation.
- Adhere to OWASP API Security Guidelines: Since plugins often function as REST APIs, apply best practices from the OWASP API Security Top 10. This includes securing endpoints and applying rate limiting to mitigate potential abuse.
LLM08: Excessive Agency
Excessive Agency in LLM-based applications arises when models are granted too much autonomy or functionality, allowing them to perform actions beyond their intended scope. This vulnerability occurs when an LLM agent has access to functions that are unnecessary for its purpose or operates with excessive permissions, such as being able to modify or delete records instead of only reading them. Unlike Insecure Output Handling, which deals with the lack of validation on the model’s outputs, Excessive Agency pertains to the risks involved when an LLM takes actions without proper authorization, potentially leading to confidentiality, integrity, and availability issues.
As an example, there could be an LLM-based assistant that is given access to a user's email account to summarize incoming messages. If the plugin that is used to read emails also has permissions to send messages, a malicious prompt injection could trick the LLM into sending unauthorized emails (or spam) from the user's account.
How to prevent Excessive Agency:
- Restrict Plugin Functionality: Ensure plugins and tools only provide necessary functions. For example, if a plugin is used to read emails, it should not include capabilities to delete or send emails.
- Limit Permissions: Follow the principle of least privilege by restricting plugins’ access to external systems. For instance, a plugin for database access should be read-only if writing or modifying data is not required.
- Avoid Open-Ended Functions: Avoid functions like “run shell command” or “fetch URL” that provide broad system access. Instead, use plugins that perform specific, controlled tasks.
- User Authorization and Scope Tracking: Require plugins to execute actions within the context of a specific user's permissions. For example, using OAuth with limited scopes helps ensure actions align with the user’s access level.
- Human-in-the-Loop Control: Require user confirmation for high-impact actions. For instance, a plugin that posts to social media should require the user to review and approve the content before it is published.
- Authorization in Downstream Systems: Implement authorization checks in downstream systems that validate each request against security policies. This prevents the LLM from making unauthorized changes directly.
LLM09: Overreliance
Overreliance occurs when users or systems trust the outputs of a LLM without proper oversight or verification. While LLMs can generate creative and informative content, they are prone to “hallucinations” (producing false or misleading information) or providing authoritative-sounding but incorrect outputs. Overreliance on these models can result in security risks, misinformation, miscommunication, and even legal issues, especially if LLM-generated content is used without validation. This vulnerability becomes especially dangerous in cases where LLMs suggest insecure coding practices or flawed recommendations.
As an example, there could be a development team using an LLM to expedite the coding process. The LLM suggests an insecure code library, and the team, trusting the LLM, incorporates it into their software without review. This introduces a serious vulnerability. As another example, a news organization might use an LLM to generate articles, but if they don’t validate the information, it could lead to the spread of disinformation.
How to prevent Overreliance:
- Regular Monitoring and Review: Implement processes to review LLM outputs regularly. Use techniques like self-consistency checks or voting mechanisms to compare multiple model responses and filter out inconsistencies.
- Cross-Verification: Compare the LLM’s output with reliable, trusted sources to ensure the information’s accuracy. This step is crucial, especially in fields where factual accuracy is imperative.
- Fine-Tuning and Prompt Engineering: Fine-tune models for specific tasks or domains to reduce hallucinations. Techniques like parameter-efficient tuning (PET) and chain-of-thought prompting can help improve the quality of LLM outputs.
- Automated Validation: Use automated validation tools to cross-check generated outputs against known facts or data, adding an extra layer of security.
- Risk Communication: Clearly communicate the limitations of LLMs to users, highlighting the potential for errors. Transparent disclaimers can help manage user expectations and encourage cautious use of LLM outputs.
- Secure Coding Practices: For development environments, establish guidelines to prevent the integration of potentially insecure code. Avoid relying solely on LLM-generated code without thorough review.
LLM10: Model Theft
Model Theft refers to the unauthorized access, extraction, or replication of proprietary LLMs by malicious actors. These models, containing valuable intellectual property, are at risk of exfiltration, which can lead to significant economic and reputational loss, erosion of competitive advantage, and unauthorized access to sensitive information encoded within the model. Attackers may steal models directly from company infrastructure or replicate them by querying APIs to build shadow models that mimic the original. As LLMs become more prevalent, safeguarding their confidentiality and integrity is crucial.
As an example, an attacker could exploit a misconfiguration in a company’s network security settings, gaining access to their LLM model repository. Once inside, the attacker could exfiltrate the proprietary model and use it to build a competing service. Alternatively, an insider may leak model artifacts, allowing adversaries to launch gray box adversarial attacks or fine-tune their own models with stolen data.
How to prevent Model Theft:
- Access Controls and Authentication: Use Role-Based Access Control (RBAC) and enforce strong authentication mechanisms to limit unauthorized access to LLM repositories and training environments. Adhere to the principle of least privilege for all user accounts.
- Supplier and Dependency Management: Monitor and verify the security of suppliers and dependencies to reduce the risk of supply chain attacks, ensuring that third-party components are secure.
- Centralized Model Inventory: Maintain a central ML Model Registry with access controls, logging, and authentication for all production models. This can aid in governance, compliance, and prompt detection of unauthorized activities.
- Network Restrictions: Limit LLM access to internal services, APIs, and network resources. This reduces the attack surface for side-channel attacks or unauthorized model access.
- Continuous Monitoring and Logging: Regularly monitor access logs for unusual activity and promptly address any unauthorized access. Automated governance workflows can also help streamline access and deployment controls.
- Adversarial Robustness: Implement adversarial robustness training to help detect extraction queries and defend against side-channel attacks. Rate-limit API calls to further protect against data exfiltration.
- Watermarking Techniques: Embed unique watermarks within the model to track unauthorized copies or detect theft during the model’s lifecycle.
Wrapping it all up
As LLMs continue to grow in capability and integration across industries, their security risks must be managed with the same vigilance as any other critical system. From Prompt Injection to Model Theft, the vulnerabilities outlined in the OWASP Top 10 for LLMs highlight the unique challenges posed by these models, particularly when they are granted excessive agency or have access to sensitive data. Addressing these risks requires a multifaceted approach involving strict access controls, robust validation processes, continuous monitoring, and proactive governance.
For technical leadership, this means ensuring that development and operational teams implement best practices across the LLM lifecycle starting from securing training data to ensuring safe interaction between LLMs and external systems through plugins and APIs. Prioritizing security frameworks such as the OWASP ASVS, adopting MLOps best practices, and maintaining vigilance over supply chains and insider threats are key steps to safeguarding LLM deployments. Ultimately, strong leadership that emphasizes security-first practices will protect both intellectual property and organizational integrity, while fostering trust in the use of AI technologies.


