TL;DR
Linux is an open-source operating system that is widely used in enterprises these days. It has many distributions such as Mint, Ubuntu, Kali. One of the most popular distributions of Linux OS is called Kali, which is widely used among penetration testers. Kali Linux has tons of free, open-source built-in tools that are awesome and used for penetration testing. These tools can do much, such as scanning a network, DNS enumeration, capturing packets over wireless and wired networks, and cracking passwords. There are also tools available for different purposes, such as forensic investigation, wireless hacking, and cross-site scripting. Kali Linux is a (kind of) complete toolbox for those who work with networks or penetration testers. With a few exceptions, these tools can only be used on Kali Linux OS. There are some reasons people don’t use Kali Linux as their primary operating system on their personal computers. One of them is it has a new environment, which is a bit harder to get used to. Another one is not all the tools on Windows are available on Linux, which causes users to face some difficulties. Likewise, tools available on Linux can not be used on Windows. Most newbies are not confident enough to install Kali Linux on their personal computers and use it (I was the same way once), but they want to use some specific tools. There are some techniques we can use to use Kali Linux tools on a Windows machine.
Looking for the available .exe file
Microsoft Windows uses a special extension for an executable file, which is “.exe.” If an individual wants to use a tool available on Kali Linux, first off, he/she should browse the web to see if the “.exe” version of that specific software is available or not. Nmap is a great example. Nmap is one of the most widely-used network scanners, which was once only available on Linux. But since 2000, the executable version of this software has also been available on Windows machines. It works properly on Windows 7 or newer versions of Microsoft Windows. Likewise, Evillimiter, which is another tool for bandwidth control in a network, can be used on Windows machines using its executable file available in this link. Finally, Aircrack-ng is a wireless hacking built-in tool on Kali Linux, yet it can also be used on Windows using its executable file available here. Those interested in using Kali Linux tools on Windows should search the internet to see if the executable file of the software is available or not. If available, they can download it and use it at their leisure.
Get Started With The "Kali Linux Fundamentals" Course Today >>
Installing Kali Linux on Windows 10 Subsystem
Here is another scenario. I want to use the Metasploit framework. I have searched for the executable file, but I haven’t been successful at finding it. Is there any other approach available? The answer is YES! Let’s dive into it.
Windows 10 has come with many innovations, Hyper-V, for example, a virtualization tool. Microsoft has brought in a new feature on Windows 10 called Windows Subsystem for Linux. Using this tool, we can use almost all of the Kali tools on our Windows machine. We can use Kali Linux on top of Windows 10. Kali Linux installation on Windows 10 Subsystem is super easy. If we summarize the whole installation process, it will only take four steps.
- Activating the Windows Subsystem for Linux
- Installing Kali Linux from the Microsoft App Store
- Setting up the Kali Linux OS
- Upgrading the Kali Linux and installing the tools
Here is a more detailed explanation.
1. Activating the Windows Subsystem for Linux
By default, this feature is turned off, so we should turn it on. Follow these steps to turn in on.
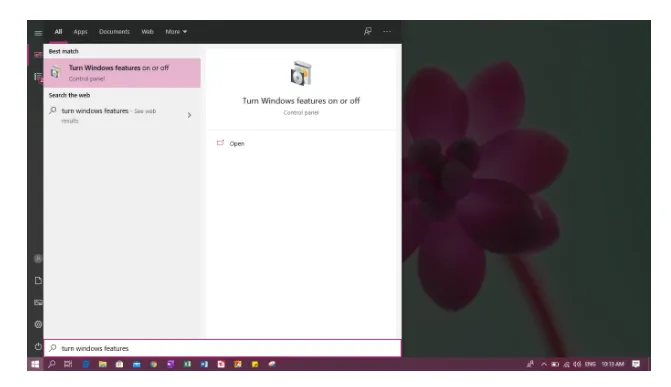
- Press the menu button and type “Turn Windows features on or off,” and a program will appear on the list. Then press Enter.
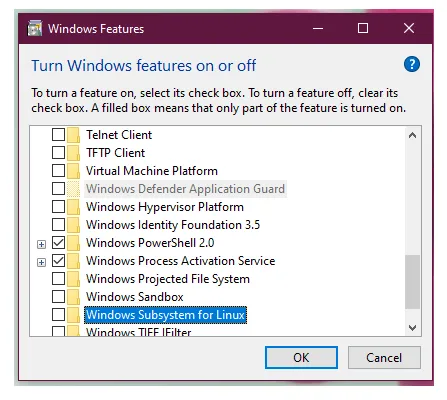
- A small window will appear. Search for “Windows Subsystem for Linux” and check the box to the left of it. Then press, OK.
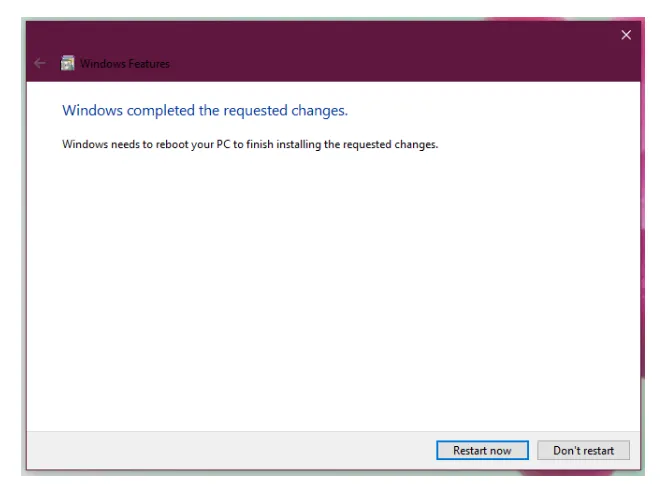
- A new window will pop out, showing the installation process, so wait for that till it finishes. Your system needs to reboot for applying the changes, so press “Restart now.”
- Once our machine is rebooted and we have the Windows subsystem turned on, our machine is ready for installing Kali Linux.
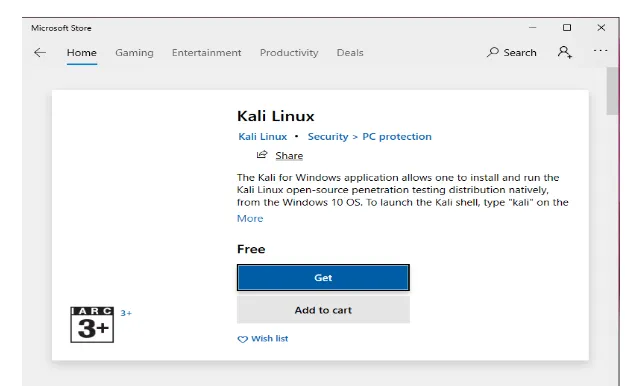
2. Installing Kali Linux from the Microsoft App Store
The official guide for installing Kali on Windows Subsystem recommends installing it from the Microsoft App Store. Take the following steps to get the work done.
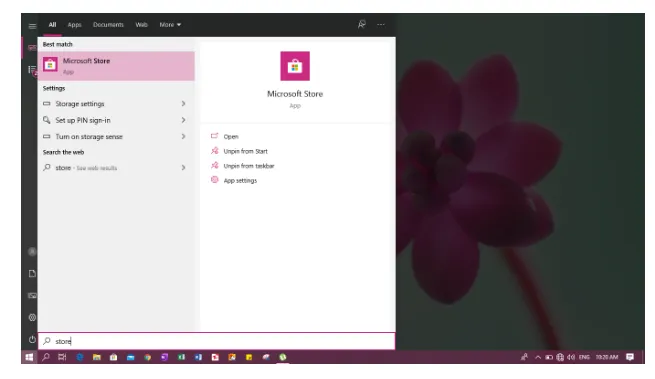
- Press the menu button and type “Microsoft Store.” The app store will appear on the menu. Then press Enter.
- Type “Kali Linux” on the search box on the top right of the window and press Enter.
- Kali Linux will appear on the Microsoft App Store window. Simply press the “Get” button, and wait till the installation process finishes. Close the window once the installation finishes.
3. Setting up the Kali Linux Subsystem
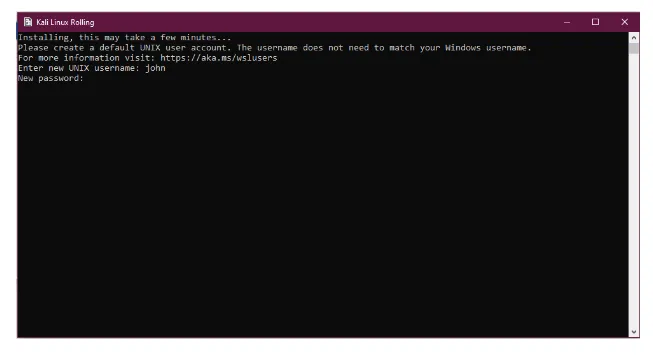
Now that we have Kali Linux installed, we need to set up the username and password.
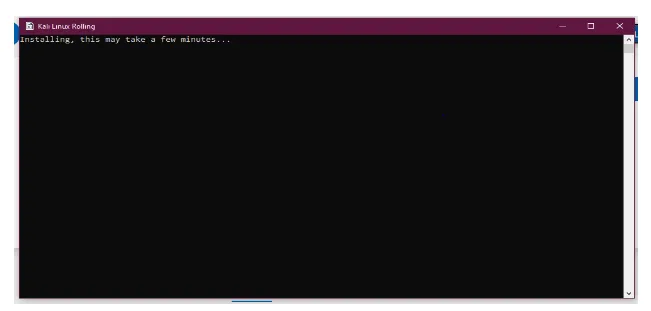
- Open the Command prompt.
- Type “kali” and press enter. The first time, it will take some time.
- Enter any username of your choice, e.g., john, and press Enter. Then type your password in the next line, and press Enter. A new prompt will appear on the terminal. (Yahoo!!! You are in the Kali Linux environment.)
NOTE: The password you type is not visible, so type your password and press Enter.
- At this point, you have Kali Linux installed on your Windows 10 Subsystem. You don’t have the tools available on Linux except for basic primary commands, like nano, ls, cat, and ifconfig. It is highly recommended to update and upgrade Kali Linux. So, you can take advantage of the tools available on it. Don’t close the command prompt window, and go through the next steps.
4. Upgrading the Kali Linux and installing the tools
- Type “sudo nano /etc/apt/sources.list,” press Enter, and the file “sources.list” will open on the terminal. Make sure you make some changes to the file, so it looks like the following picture. (It will also ask for password if sudo is used for the first time in the current terminal)
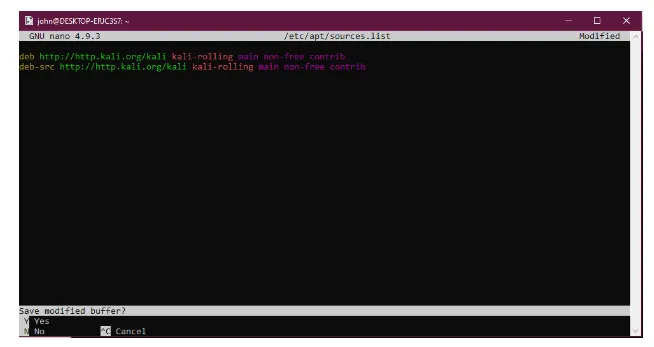
- After changes are all done, press “Ctrl + X” and then press “y” to save your changes. Then press Enter. You will be returned to the terminal.
- Type “sudo apt-get update; sudo apt-get dist-upgrade” and press Enter. The password is required, so type your password and press Enter. These two commands will fetch the updates and install them on your machine. So, it updates your Kali Linux machine.
- If you want to install any software which is not available, e.g., Metasploit framework, type the following command and press Enter.
sudo apt-get install metasploit-framework
If you want to install git, type “sudo apt-get install git.” Likewise, if you want to install python3, type “sudo apt-get install python3”. For installing any software available on the current repository, just type the command “Sudo apt-get install SOFTWARE_NAME” and press Enter. The installation process will take some time, so be patient and let the program be installed.
- Now, you can use any of your Kali Linux favorite tools on your Windows 10 machine, and this is amazing!
As someone who has had Kali Linux as a primary operating system on my personal computer for around two years now, I think Kali Linux is a whole new world. There are many great tools like Burpsuite, Metasploit framework, nmap, wireless tools, john the ripper, and beef-XSS. A lot of other tools can be obtained from Github to do great stuff on a network. There are free resources available for learning Kali Linux. Cybrary has a great introductory course for beginners called Kali Linux Fundamentals, which covers some of the most popular topics. Kali Linux Revealed is a book available on the Kali Linux official website. Cisco Network academy also has a Linux course. Whatever the method, build those Kali skills by learning it.