TL;DR
Hi Cybrarians.
Day by day, the profession of digital forensics implies a challenge about changes of technologies, here I’m going to explain how to acquire a forensic image using FTK Imager in command line interface (CLI) and Linux.
Traditional procedure
The way to get the image for me most times is by removing the disk of the pc and connect it to the forensic station using a write blocker device. Until one day, a laptop with a Solid-State Drive (SSD) came to me, and it had more RAM than a hard disk (see the Image 1 below).

Image 1. Solid State Disk
Changing the Procedure
Well, I couldn’t connect the disk to any other device, so I decided to fire up the laptop using the Hirens Boot CD (http://www.hirensbootcd.org/download/). It comes with a light Windows XP version called “Mini Windows XP” and I planned to the use FTK Imager Lite for Windows (http://accessdata.com/product-download/digital-forensics/ftk-imager-lite-version-3.1.1) which runs stable when I have to acquire the image in situ (visit to another place or when there are limitations to move the hard disk at your office).
I tried switching a lot of configurations in the BIOS of that laptop, but the Mini Windows XP never booted, so I had to move to Linux.
Using FTK in Linux
I used the latest release of Ubuntu Desktop 16.04 (http://www.ubuntu.com/download/desktop). At this point, I want to tell you I tried to boot that laptop with several Linux forensic distributions like Kali, Caine and Deft, I didn’t try REMnux for instance. The laptop did not respond, the only thing that worked was Ubuntu.
Image 2. Start screen of Ubuntu 16.04
Let’s do it
First thing, download FTK Imager for Linux (http://accessdata.com/product-download), looking for “Command Line Versions of FTK”. The version I used was x64, version for x86 processors is available too.
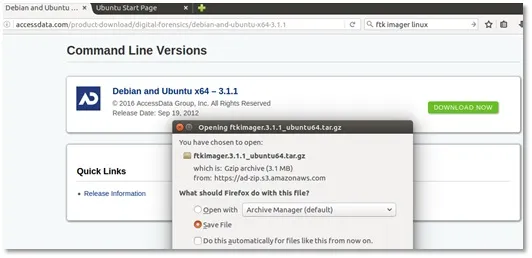
Image 3. FTK Imager CLI download
After downloading, the program itself does not execute because you have to move to a specific path. Follow this steps to take the program to the right location.
1. Download FTK, by default it goes to the Downloads folder.
2. Open a terminal, extract the tar.gz.
tar zxvf ftkimager.3.1.1_ubuntu64.tar.gz
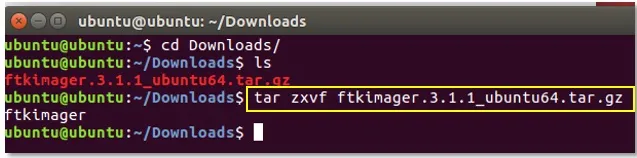
Image 4. Uncompressing FTK Imager CLI
1. Move the file. First you have to do it in root mode.
sudo su
2. Ubuntu asks for a password. In live mode just hit the Enter key, because there is no password.
3. Moving the file
mv ftkimager /usr/local/bin/

Image 5. Moving FTK Imager CLI to execute anywhere
Now you are able to run the program wherever you are. Ubuntu recognizes and executes FTK, just type in the terminal ftkimager.
To get the full help of FTK type ftkimager –help and you will see something like this (Image 6):
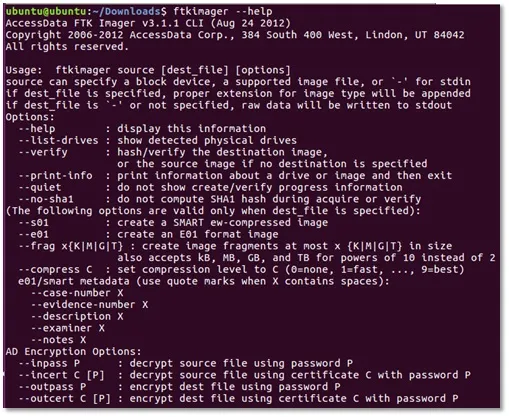
Image 6. Full list of FTK Imager CLI options
To acquire the forensic image, check where the hard disk is mounted by typing ftkimager --list-drives. It shows something like this (Image 7):
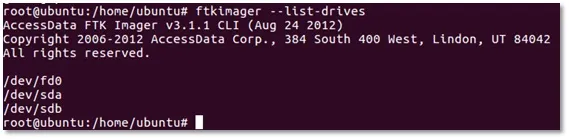
Image 7. Listing drives with FTK Imager CLI
I recommend that you make completely sure which is the target disk to get the image. The best way to do it is by running the fdisk -l in the terminal. It will show more information about the hard disks.

Image 8. Fdisk -l to show all disks
The image above (Image 8) is an example of a Kingston USB memory with 8 GB. In this lab this is the source device to acquire the image.
I created a folder named “Folder” in Ubuntu’s desktop to make there the FTK’s forensic image. At this point you can choose any location where you want to copy the files but, for really hard disks with lots of GB, the best way is using an external USB hard disk with enough space to assure the image. For example, for a target hard disk with 500 GB, you should have another disk with at least 500 GB of free space to get the forensic image files.
The taxonomy of ftkimager is like this:
ftkimager disk_target_to_acquire destination_path options
Some of the options obviously are the same if you’ve used FTK Imager Lite in Windows, I’m going to show you those Linux commands with a comparison of the options in Windows OS.

Image 9. Comparison Windows – Linux options to acquire the forensic image
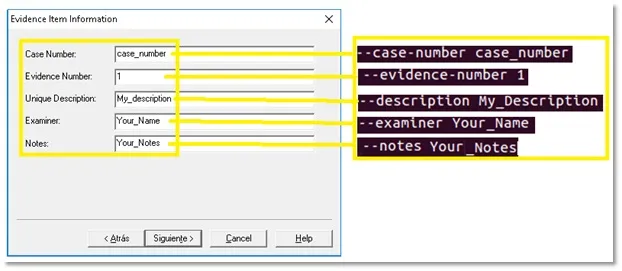
Image 10. Comparison Windows – Linux options to document the case
The full command of this example is the following (Image 11):

Image 11. Full command to run FTK Imager
Where:
1. /dev/sdb – Is the source, the disk to acquire the image.
2. /home/Ubuntu/Desktop/Folder/image – The destination of forensic image files, Folder is where the files will be storage, image is the name of the file.
3. --e01 – The format of the image, this kind is for Encase image file format.
4. --frag 1500MB, each file will have a maximum of 1500 Megabytes, ftkimager split the entire image in the necessary files with this size.
5. --compress 6, level of compression for the disk image.
6. --case-number, the number of the case.
7. --evidence-number, the evidence number.
8. --description, any comment for your case.
9. --examiner, your full name or acronym of your name.
10. --notes, any additional comment you want.
Running the command and options above, the following will show even with the ongoing process (Image 12):

Image 12. Running FTK Imager acquiring
When the process of acquiring the image is done, FTK creates a .txt file with the summary (Image 13) in the folder where is stored the image’s files, including features of the disk like the image’s hash values. Please be aware also when this sort of cases is for law purposes. Remember, I used for this article a USB drive to explain the process, the real scenario was with a Solid State Disk SSD. The image hash value does not have trust by itself because the changes of data in SSD drives. You always have to get the hashes of every single file for that sort of devices.
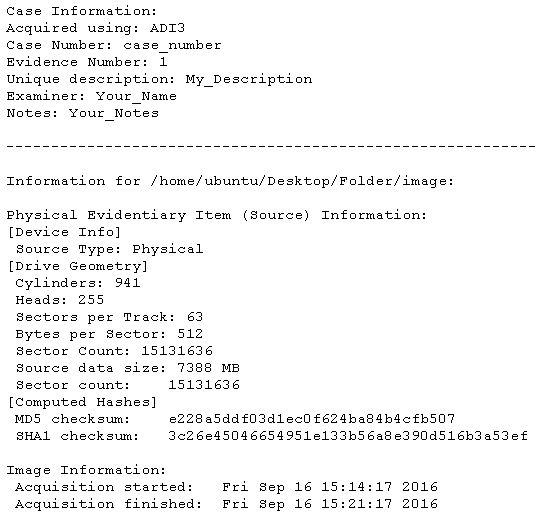
Image 13. Summary txt file of FTK
I hope you find this article very useful to know another way to proceed with recently disks and the use of this tool in the CLI.
Cheers from Colombia to all the Cybrary community.