TL;DR
Welcome Back Cybrarians!!!
Today, we're going to talk about pentesting a home router's web interface. When you break into a network (as pentester/hacker), you need to know how to access the web interface to gather more information about how to escalate your privileges within the system.
But, Why???
- Information from the router helps you to know the connected devices on the network (this will give you a chance to customize suitable attacks on the connected devices)
- The services that are enabled is also great to know
- At the end, we can use the router to ---> upload a backdoor...just to be around…
In this tutorial, we'll be pentesting the interface using two methods:
Method 1: Default Credentials
Method 2 : Dictionary Attack with Burp Suite
NOTE: I'm assuming that we know the network password. We'll cover breaking into the network in another tutorial.
Tutorial Requirements:
- Router (Pentest your home router)
- Kali Linux on VirtualBox (Use Bridged Network)
- BurpSuite (Use the Kali Linux community version)
Step 1: Define your Coordination on the Network Map
Now that you are connected to the intended access point, you need to know the Default Gateway in order to access the interface:
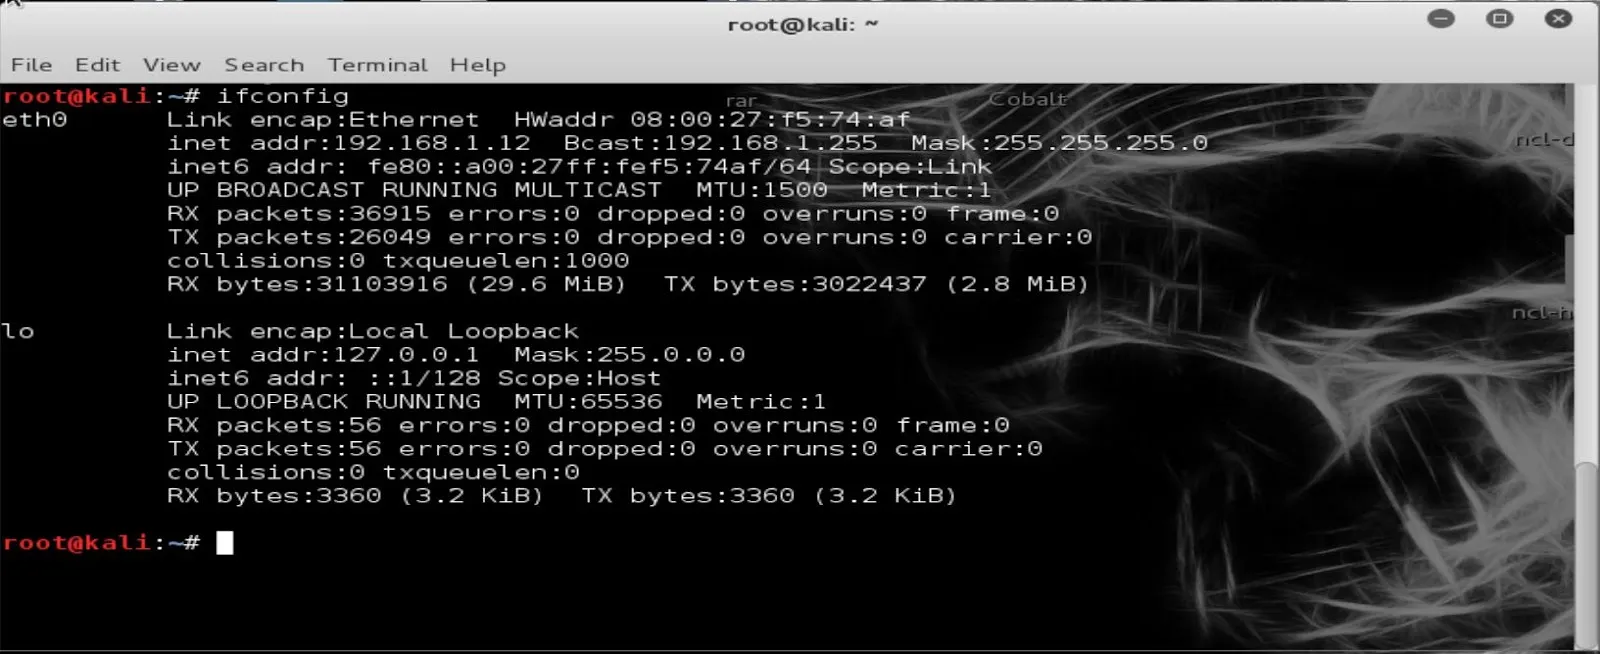
- Type ifconfig in the terminal to make sure you have a valid internal IP address
---> Ifconfig
Use the IP Routing table command to get the default gateway of the network
----> route -n

The default Gateway of this router is 192.168.1.1
192.168.1.1 is gateway IP address for our computer. The flag U indicates the route is up and G indicates that it's a gateway.
Step 2: Access the Web Interface
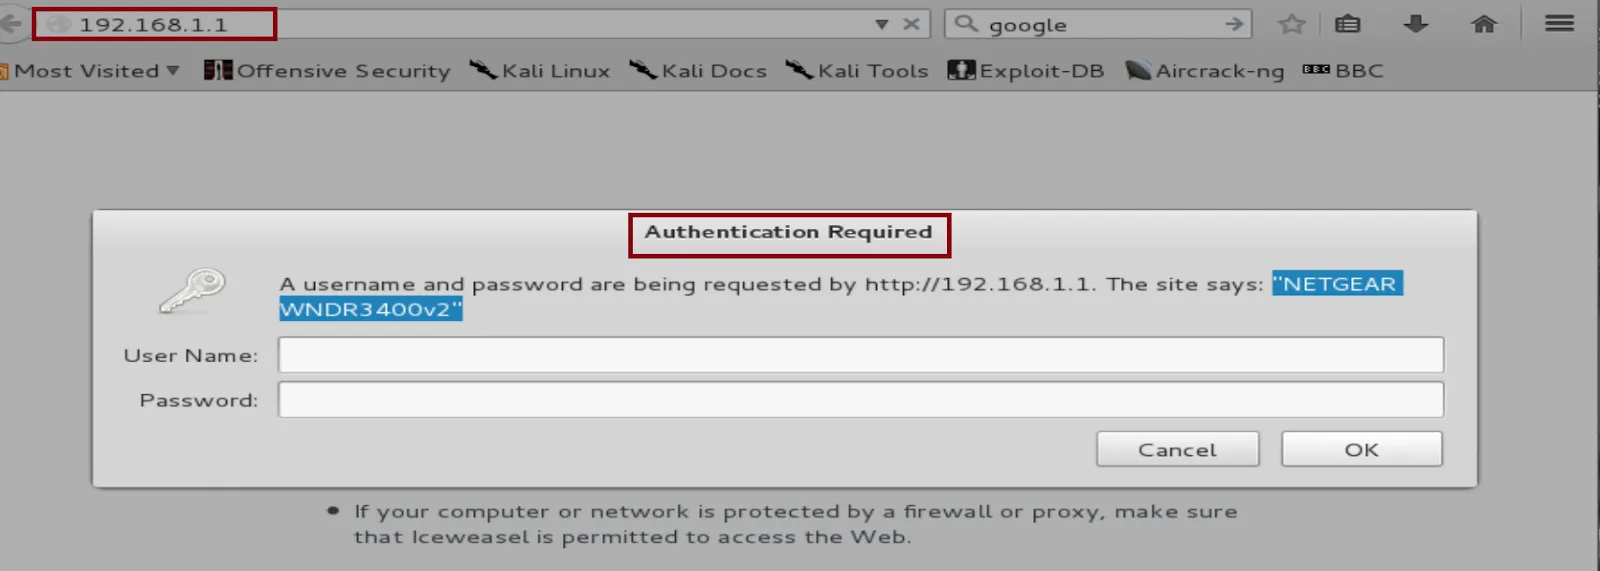
Open a web browser and type the Default Gateway in the URL address
Now that we come across the web interface, we have two methods to deal with that…
Step 3 : Use Method 1 ------> Default Credentials
One of the important things that we need always to remember is that as pentester/hackers, we need to escalate our penetration tactics from very obvious techniques to the most customized ones. Therefore, starting with testing any web interface with common default credentials can help save a lot of time and effort. More than 50 % of regular users do not change any default settings or credentials of their personal network (as long as it's working, nobody cares whether it is secure or NOT).
In the image above, we see that the router’s name is NETGEAR and its model is WNDRV3400v2. We can look for the default passwords by Googling the exact version.
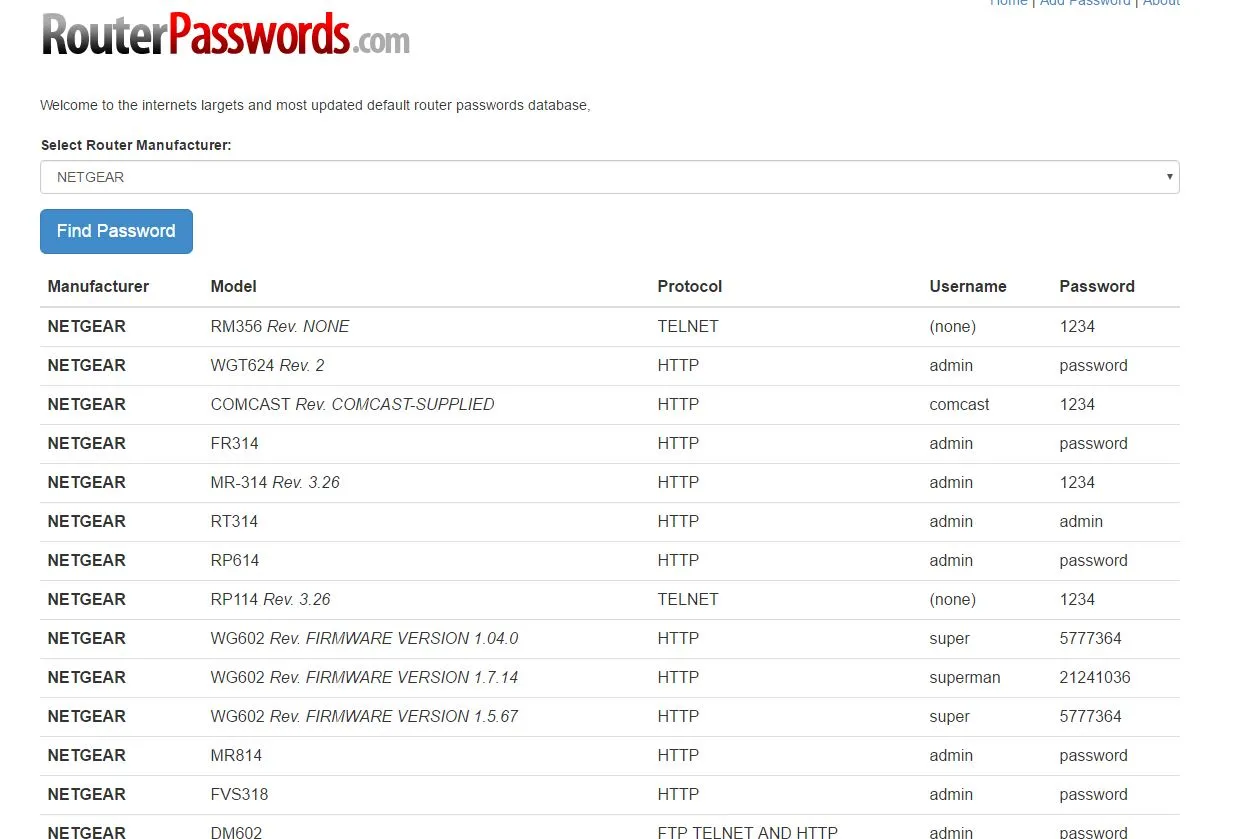
Sometimes, you can get information from the official website or use the RouterPasswords Websites.com: http://www.routerpasswords.com/
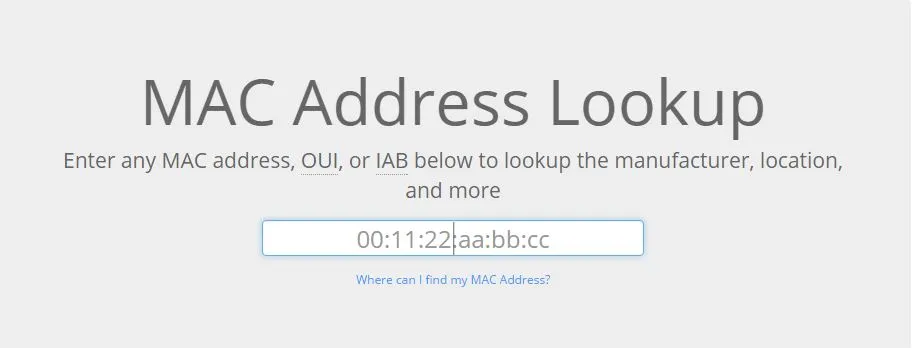
Also, it's possible to check the router MAC Address to determine the router model name.
MAC Vendor Lookup: http://www.macvendorlookup.com/
Once you find the username and password, try them. They might work surprisingly.
Step 4 : Use Method 2 ------> Dictionary Attack with Burp Suite
In this method, we're going use a dictionary attack to crack the web login page.
Configure the browser to use the local proxy
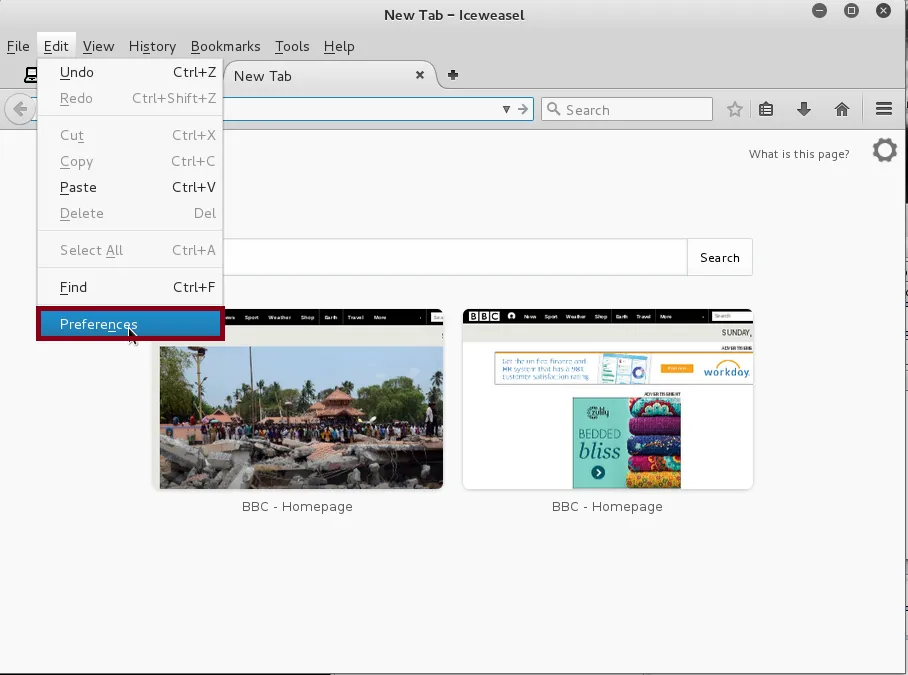
Go to Edit ----- > Click on Preferences
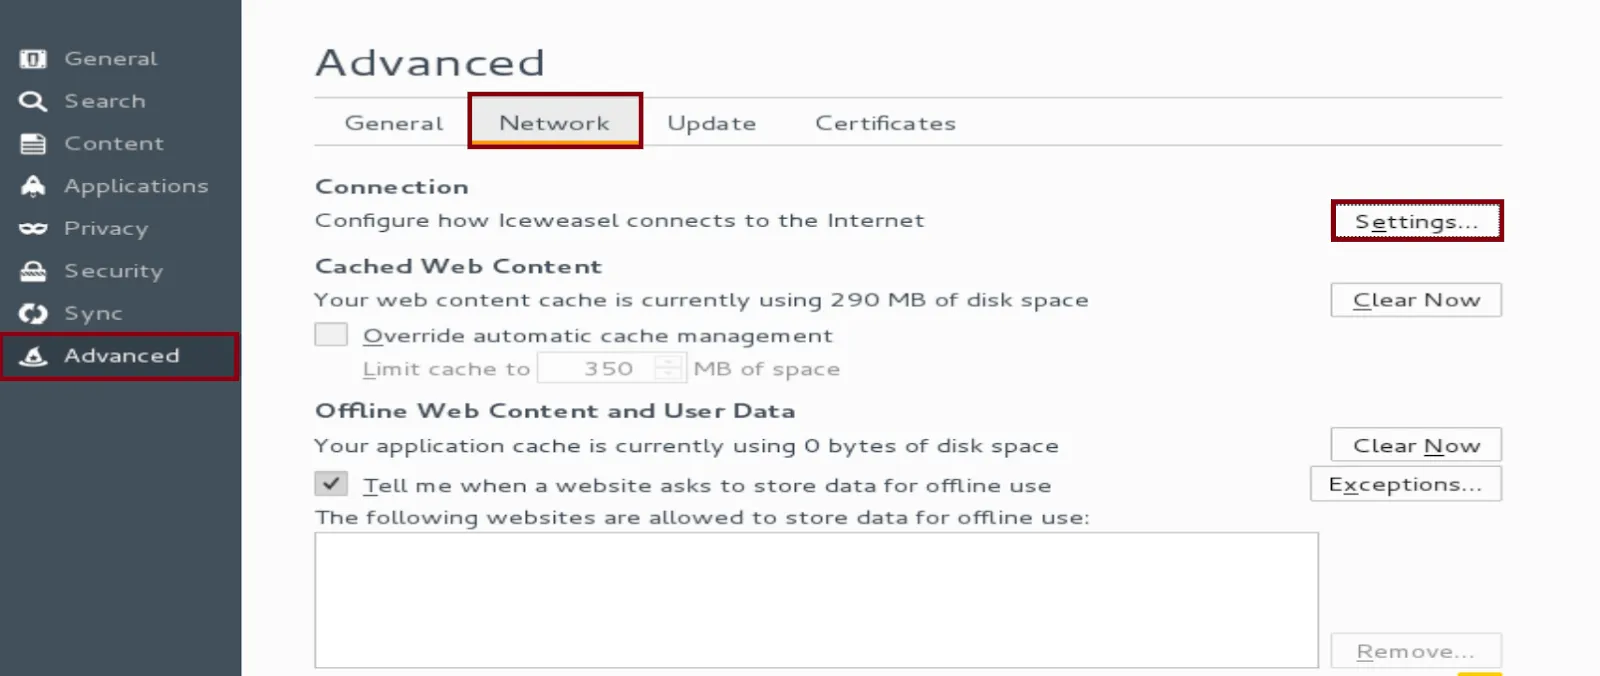
When we get to the Preferences page, click on Advanced ------ > and then Network tab and click on Settings.
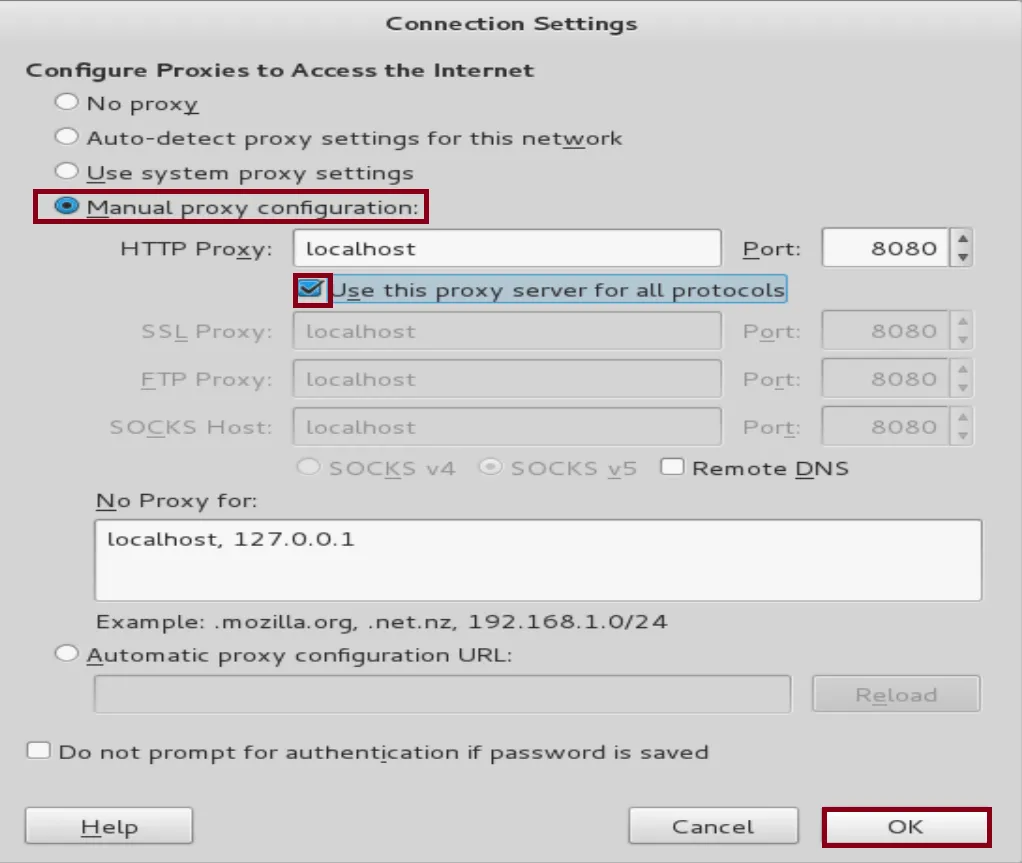
In the connection setting window:
- Choose --- Manual Proxy Configuration. Set up the HTTP proxy as localhost and for the port 8080
- Check “Use this proxy server for all protocols” box
- Click "Ok" to save all changes
Forward Requests through Burp Suite

Open the Burp Suite and go to Proxy ----> Click on Forward
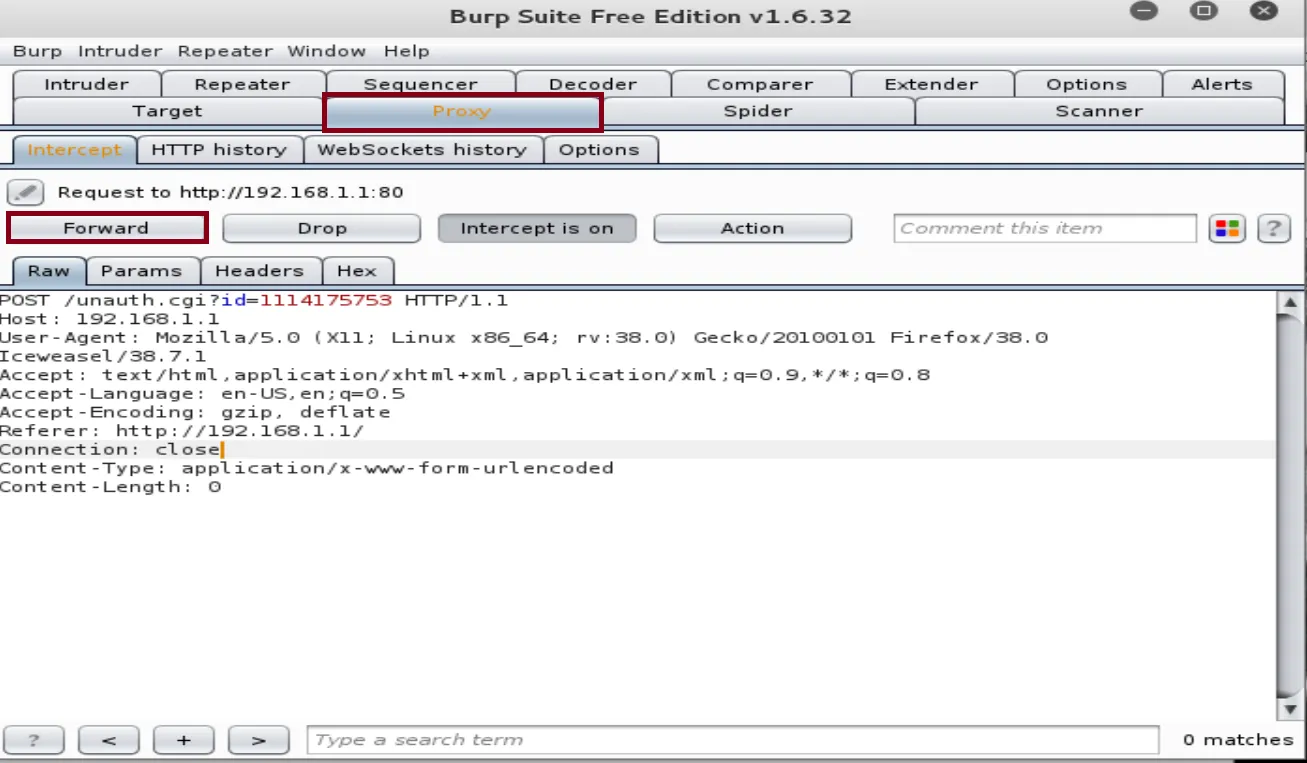
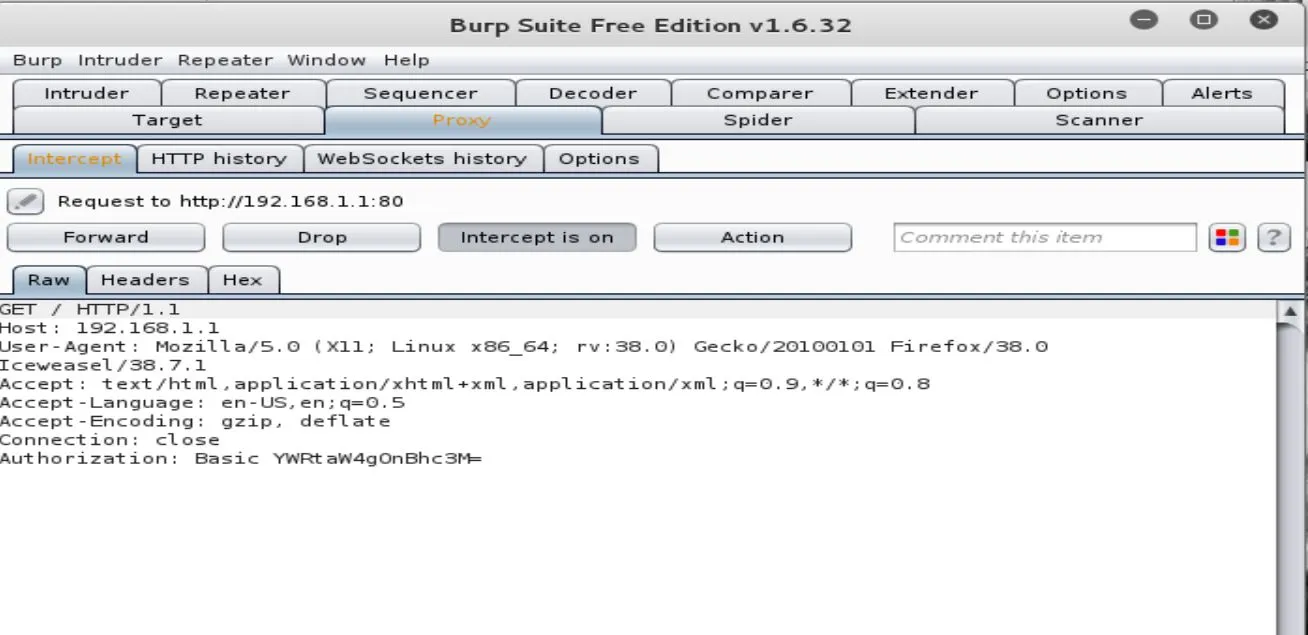
Once the requests are forwarded, go to the default gateway page and you should see this page:
For testing, if the requests are forwarded correctly, try to fill the username and password fields with anything that an attacker would do. You should get results back in the proxy field:
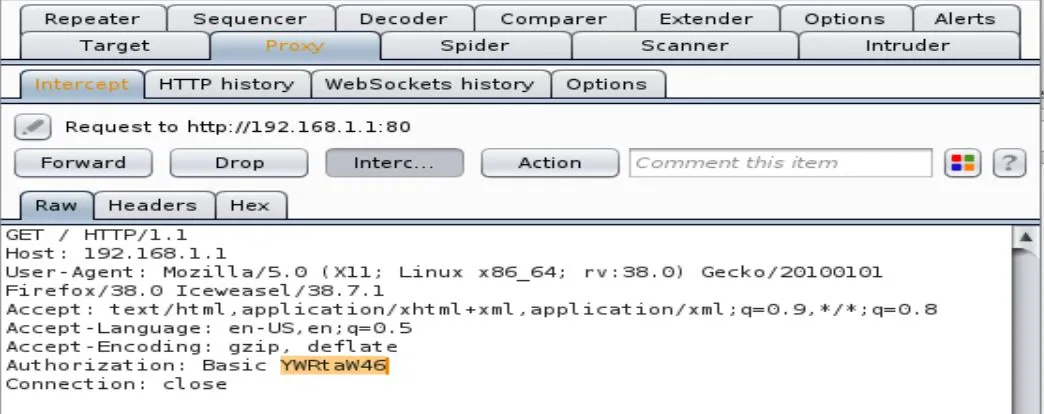
Highlight the authorization code
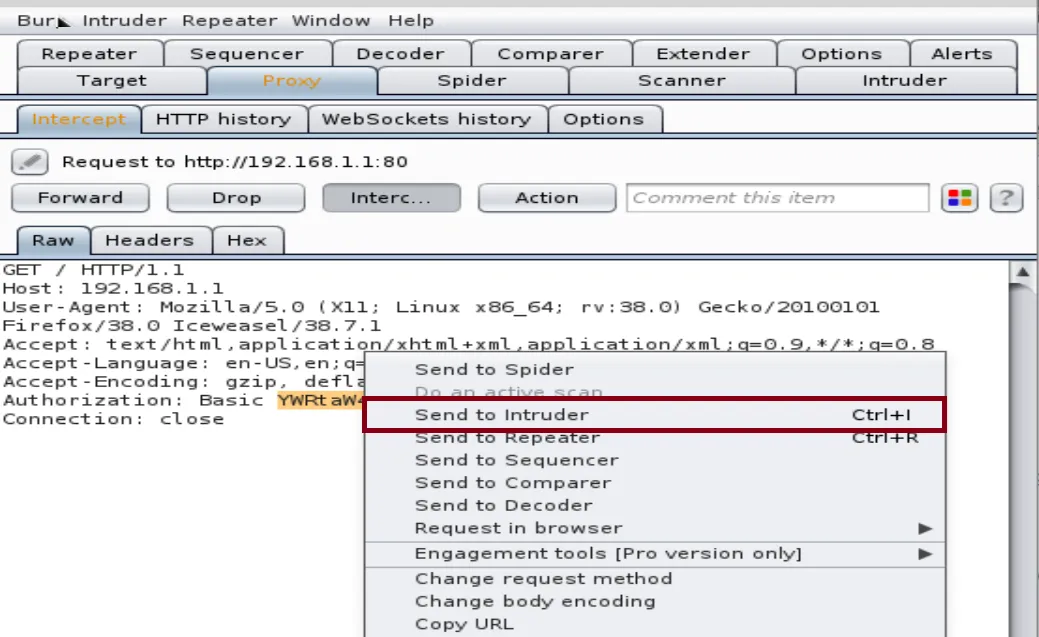
Right-click on the highlighted code and choose "Send to Intruder"
Open the Intruder tab and click on position to add the authorization code to the payloads

For this attack, we're going to use a Sniper type of attack.
Note: Sniper is an attack that enumerates over each parameter, one at a time. If you have multiple parameters, it will enumerate the first parameter with all the payloads from the wordlist supplied and then move on to the second and so on.
In the payload section, we're going to choose payload type as simple list. The simple list is going to be rockyou.txt wordlist that has most of the commonly used passwords.
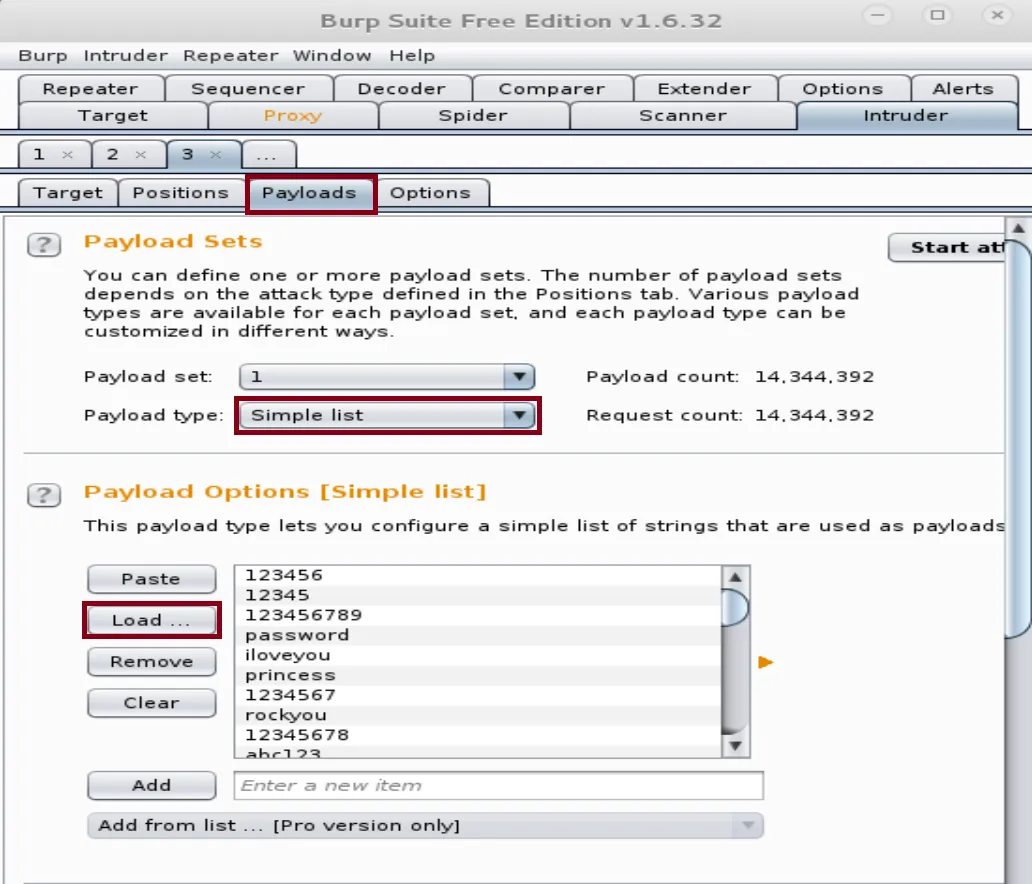
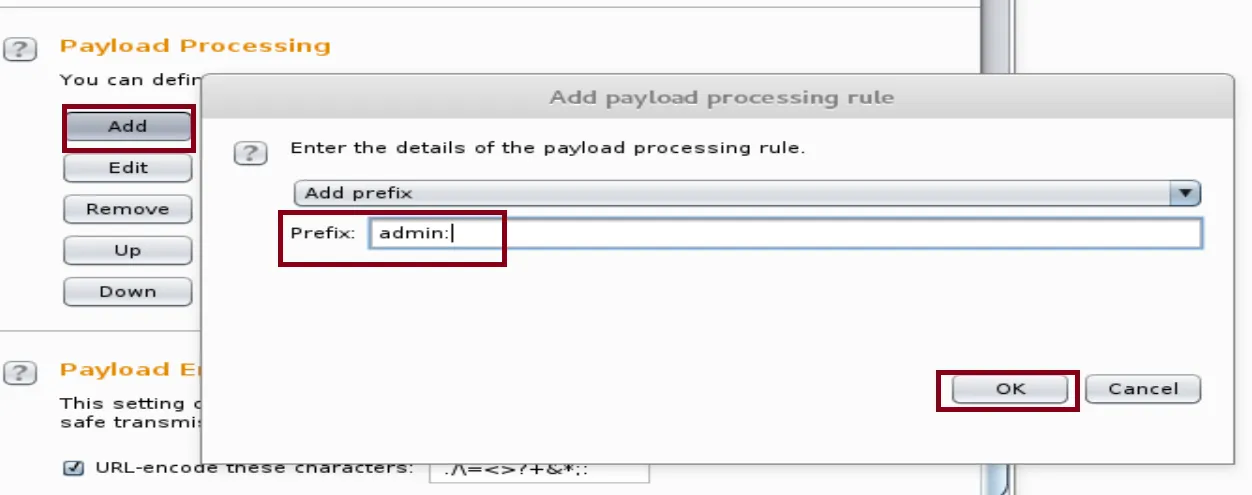
Once it's loaded, we're going to add rules for the payload processing and encoding
First Rule: Adding a Prefix
For this tutorial, we're assuming that the username is a default name as admin.
Second Rule: Add Base64 Encoding Rule
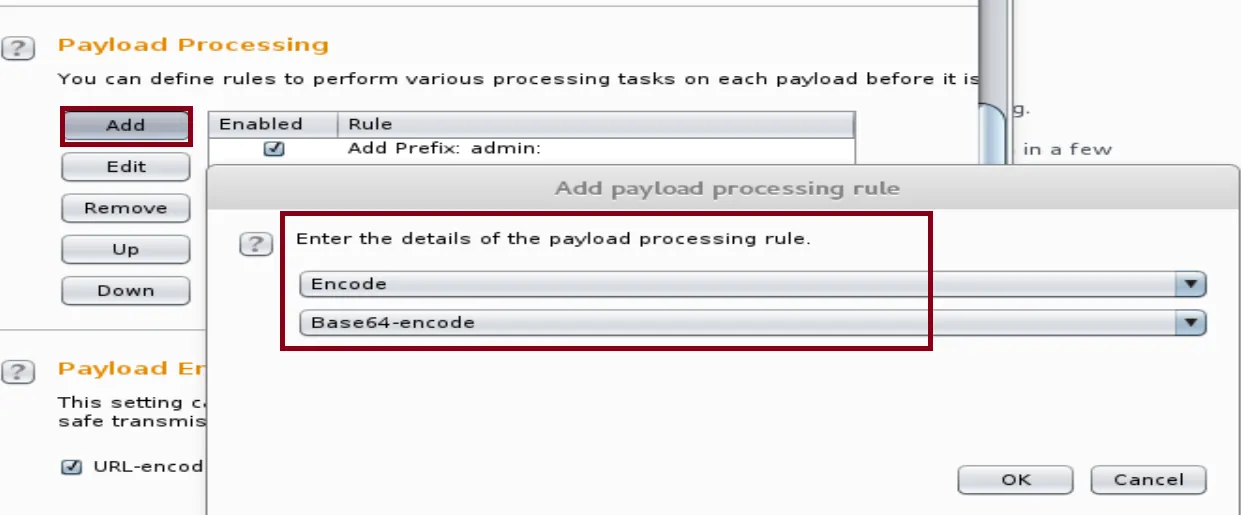
The rule will encode the wordlist to Base64
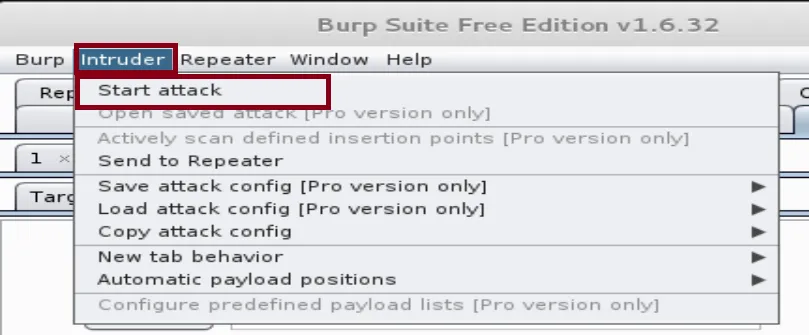
Start the Intruder Attack
After setting the up the rules, we start the attack. Go the Intruder Tab on the menu bar and choose Start Attack.
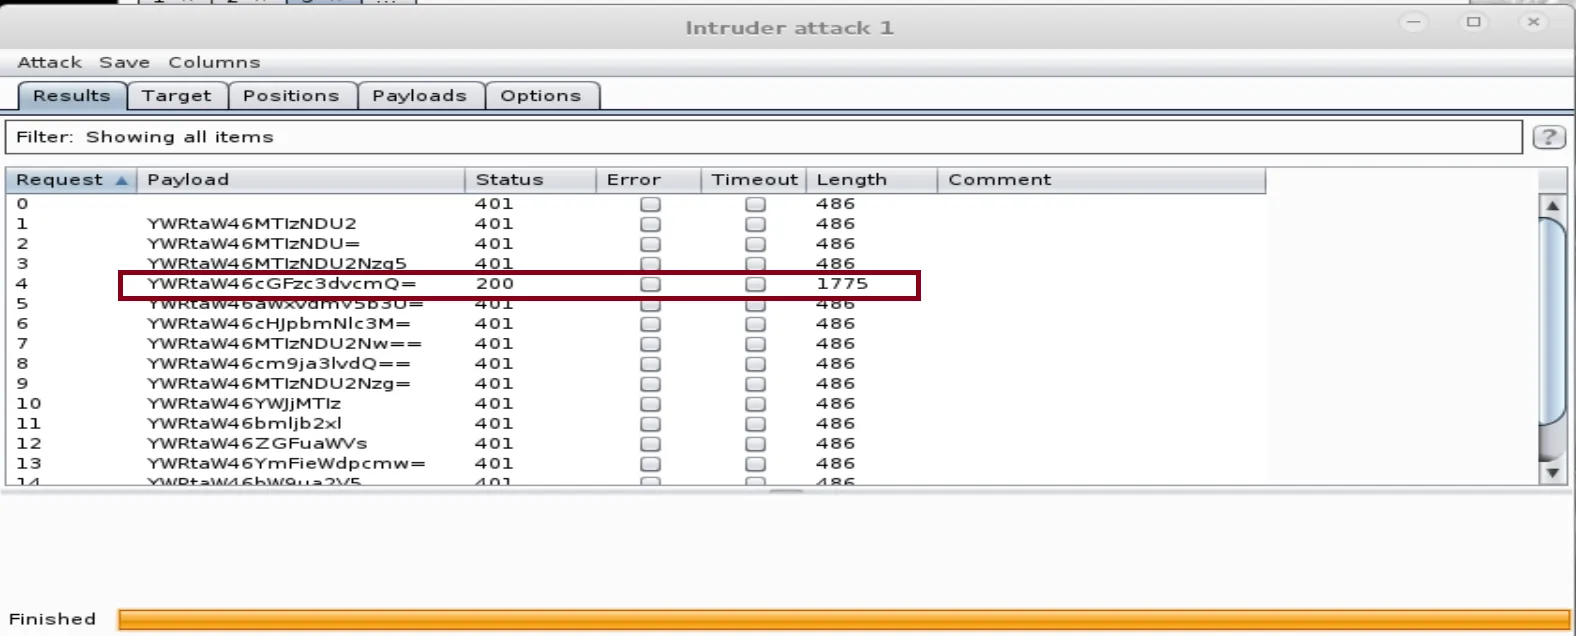
The attack will try every word in the list until it finds the right one. The wrong passwords will result in 401 status (Unauthorized Access). However, the 200 status will result in finding the correct password. When you get the 200 status, click on it and go down to the Raw tab:
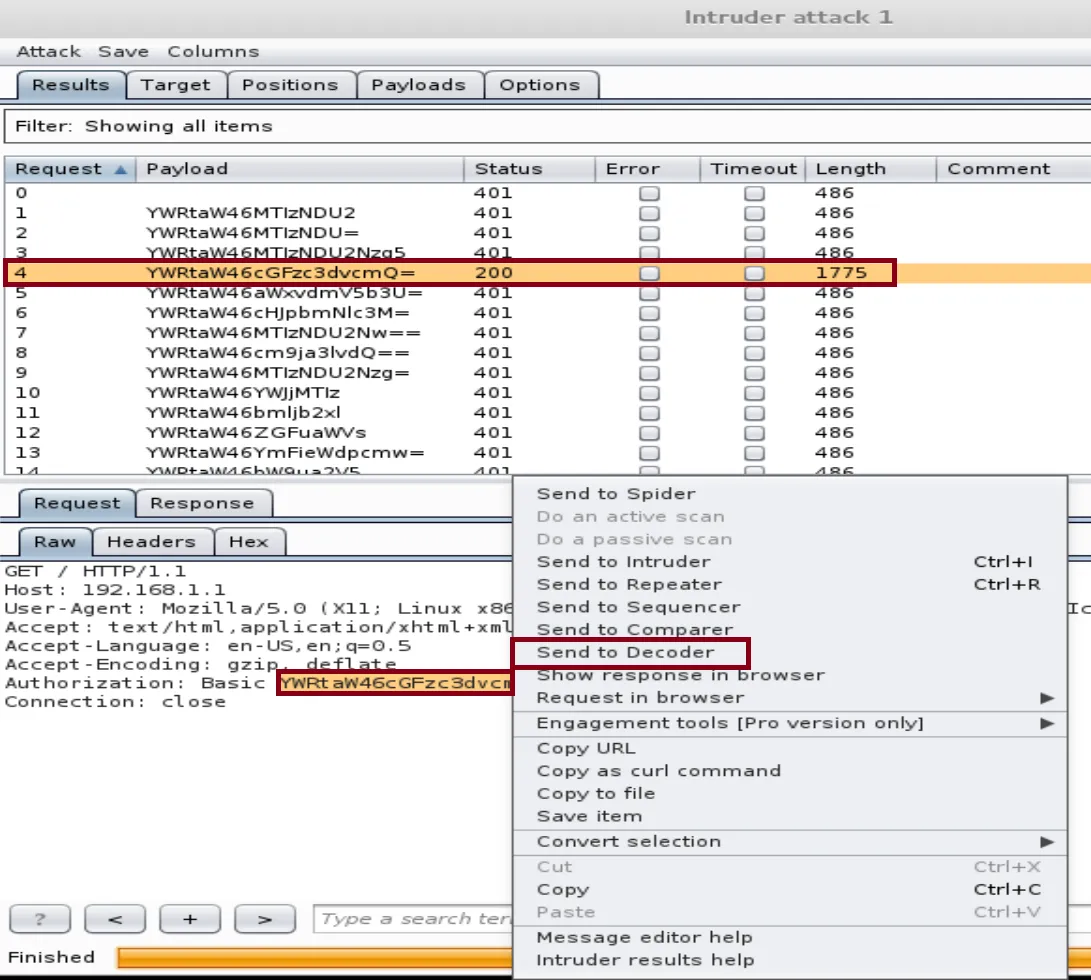
You should see the Authorization code as the above picture.Highlight and right click to choose Send to Decoder.
Decode the Password
Go to the Decoder tab and Choose Decode as Base64
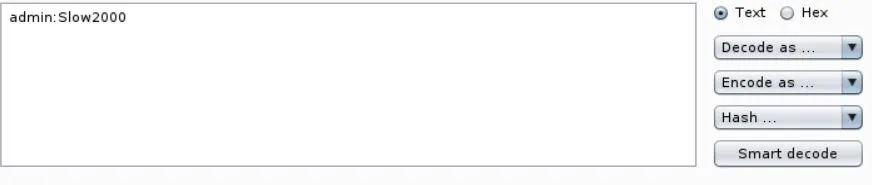
You should see the decode password as the above picture. The password turned out to be “Slow2000” for this Web interface login. Note: When you decode a password, sometimes you need to click on smart decode first, then Decode as Base64. Thanks for reading!@ZeeMaXX