TL;DR
GNS3 (Graphical Network Simulator-3) is a network simulator software used to simulate routers, switches, and other networking devices, and it runs on Cisco IOS. Cisco uses proprietary software called Cisco IOS for its routers and switches. GNS3 does not include any Cisco IOS in its default installation since Cisco IOS has copyright laws to protect it. It only facilitates a platform to use Cisco IOS but does not provide any Cisco IOS itself; if someone wants to use any Cisco device in GNS3, they must install that device’s IOS first.
This blog is for the users who want to simulate the router environment in GNS3VM irrespective of the vendors (Cisco, Juniper, etc.) The previous blog explained how to install and configure the GNS3 VM. The blog also discusses how to configure a device through a template (from GNS3 Marketplace). In this blog, the following three parts will discuss the installation process:
A) Downloading Cisco IOS As previously discussed, we must have an IOS file to install a Cisco device in GNS3. We can either get the file from a Cisco device or download it from Cisco’s official website (which requires a valid Cisco account and license agreement) or from an educational website.
The abovementioned link directs to a Google directory which has the largest collection of Cisco IOS files.
B) Installing Cisco IOS in GNS3 It is possible to install a device on the GNS3 Virtual Machine(VM) that is not available in GNS3 Marketplace (CISCO IOS). GNS3 has a feature called Dynamips which allows users to install (CISCO IOS) images and emulate the router environment. To perform router installation, we must have an IOS image.
Let us install router C-3640 on GNS3 now.
STEP 1: Open the GNS3 VM. Navigate to Edit > Preferences > Dynamips > IOS routers.
STEP 2: Click on the “New” button and select “New Image”.
STEP 3: Select the downloaded image of the router to install on GNS3 VM by clicking on “Browse”. Click on “Yes” to decompress the image.
Note: By default, IOS files are compressed but GNS3 supports both compressed and decompressed file formats. Compressed files consume less space and are easier to manage.
STEP 4: Verify the file path and click on “Next”.
Note: If the selected IOS file is for an outdated device, the wizard may display a warning message.
STEP 5: Now it will extract hardware information from the selected IOS file and list information in the next window with a device name. If the information is incorrect, the correct platform or chassis number is shown from the dropdown menu and can be selected. The device’s name can also be changed if needed.
STEP 6: Now assign memory (RAM) to the device and click on “Next”.
Note: 256MB of memory would be enough for simple operations but if unsure about how much RAM is required,click on the “Check for minimum and maximum RAM requirement” link available on the screen.
STEP 7: If the selected IOS belongs to a modular device, the following screen will ask the user to install the interfaces in available slots. Select from the list and click on “Next”.
STEP 8: The next screen allows the user to install WIC interfaces in WIC slots if the selected IOS belongs to a device that has WIC modules. Select from the list and click on “Next”.
STEP 9: Now click on the “idle PC-finder” button to allow GNS3 to input the value automatically and use it.
Note: Idle-PC value operates to prevent the device from utilizing 100% CPU.
STEP 10: Click on “Finish” to complete the installation and close the window.
C) Using the installed device To use the installed *Router-3640 *device, follow these steps:
STEP 1: In the GNS3 GUI application window, click on the “Browse all device” menu button.
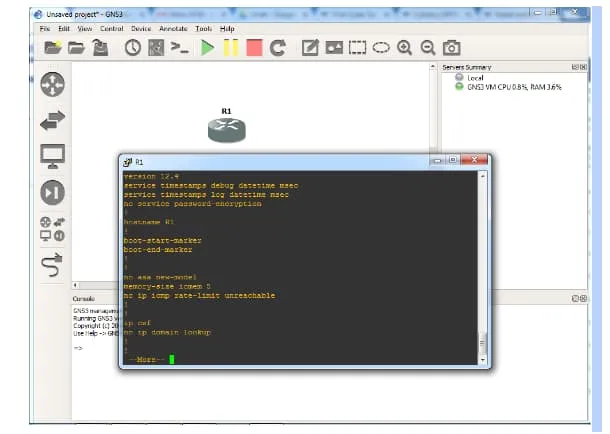
STEP 2: Select the router and drag it to the workspace area.
STEP 3: Click on the “Run” button or navigate to the “Control menu” and click on “Start/Resume all the devices” to run the device
STEP 4: Right-click on the device and select “Console”. Afterward, a window appears where one can configure the device according to the user’s needs. All the IOS commands are run on this window to configure the device.